• Home
  • Blogger
  • Github
  • Travel
  • The Tank Project
skip to main | skip to sidebar

Steven Occhipinti

A braindump.

Printing over previously printed characters and lines

I recently wrote small Ruby Gem that provides a command line interface to Melbourne's TramTracker service.

One main feature I wanted was to allow the script to poll TramTracker on a regular basis.
In the past, I used the command line utility watch to achieve this, but I couldn't find a way to enforce a "max iterations" option. If it gets forgotten about in the background, TramTracker will eventually block that IP address!

So I turned to Ruby. Now instead of printing the same block of text over and over again and filling up the terminal, I thought it would be better to just have that text overwrite itself in place.

In this post, I'll outline a couple of ways of achieving this.


Using the \b (backspace) character

Printing a \b character does the same thing as pressing backspace. This is really simple to use and is great for little "progress" spinners. For example, a character that cycles through '|', '/', '-', '\'. For example:
puts "foo\b\b\bbar"   # => bar
("|/-\\"*10).chars.each {|c| print c; sleep 1; print "\b"}  # => Cheesy, old-school spinner
There are two main shortfalls with this approach, one is that it only works on a single line and two is that if you want to overwrite lots of characters, you'd need just as many \b characters (you would probably introduce a loop).
puts "foo\n\b\b\bbar"  # => foo\nbar

Using the \r (carriage return) character

To avoid having to repeat just as many '\b' characters, a simple alternative would be to return the cursor to the start of the line and write over the top of the existing characters. For example:
100.times {|p| print "\rDownloading %#{p+1}..."; sleep 1}
This approach still won't work across multiple lines, but it has another subtle shortfall too, it doesn't clear the entire line. For example:
puts "foo\rp" # => poo
A common work around for this is to pad the end of the string with spaces, but there are better ways (keep reading ;)


Using curses

The most common answer to overwriting characters across multiple lines, is to use curses.
Curses allows you to pick exactly with character you want to update and makes menu driven Text User Interfaces (TUI's) easier to develop.
Ruby happens to have a curses module built in to its standard library, which provides a simple API, for example:

setpos(lines/2, cols/2) # Start in the middle
addstr("Hello world")

I created a more complete (simple) example of using curses in a gist here.

Curses is pretty good for this sort of stuff, it gives you a lot for free.
The thing that I didn't like about using the curses library was that when it initialises, it clears the screen.
This behaviour suits a TUI, and the old contents is still restored when you return, but I was being picky and didn't want that.


Using individual cursor movement characters

This last option is the most fundamental of the bunch. Terminals generally support characters that will allow you to move the cursor around at will and would be the basis of things like curses, although not as commonly used. Here are the most common characters to move the cursor around:
Move the cursor to line L, column C
\033[<L>;<C>H
Move the cursor up N lines
\033[<N>A
Move the cursor down N lines
\033[<N>B
Move the cursor forward N columns
\033[<N>C
Move the cursor backward N columns
\033[<N>D
Clear the screen, move to (0,0)
\033[2J
Erase to end of line
\033[K
You can read more about these "escape sequences" here.
I ended up using the '\033[K' ("Erase to end of line") and the '\033[A' ("Move the cursor up") characters in my TramTracker gem and it worked a treat!


Now go and make a cool retro user interface! :)


Posted by Steve at 01:27 0 comments
Labels: bash , linux , programming , ruby Email This BlogThis! Share to X Share to Facebook

"Safe mode" on the Samsung Galaxy S3

I recently had some trouble with my Samsung Galaxy S3. I'm still not sure what caused it, but quite frequently, it would completely freeze up, even after a fresh reboot. It may have been a dodgy app, or something deeper in android, but in the process of fixing it, I was introduced to "safe mode".

"Safe mode" here behaves like safe mode in Windows. It basically lets you use your phone just like normal, but without starting the usual plethora of background processes. You can still get to your settings, apps and files, but things won't start automatically.

To enter safe mode on the Galaxy S3 is really simple:

  1. Restart the phone
  2. While it is booting up (and you see the Samsung logo) simply hold the volume down button


When it boots, you should have the stock wallpaper, your shortcuts will be gone and you should see a little watermark in the bottom left corner that says "Safe mode".


From here you can do everything like normal, browse the net, make calls, etc. but more importantly, you can uninstall dodgy apps, change settings, even factory reset the device.

Posted by Steve at 14:36 0 comments
Labels: android , Samsung Galaxy S3 , troubleshooting Email This BlogThis! Share to X Share to Facebook

How to make tomato sauce

This time of year is "tomato season" and it's an Italian tradition of ours to spend a weekend together and make enough tomato sauce to last us the year. Of course, everyone does this differently, but here I'll outline how our family does it.

1. Buy some "sauce tomatoes"

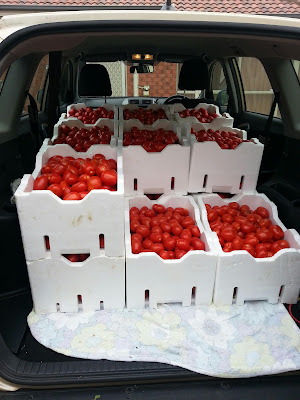
If you go to any suburbs that have an Italian community you'll most probably see signs for people selling "sauce tomatoes". Sauce tomatoes are normally more ripe than usual, which makes them ideal to turn into sauce. We bought 16 boxes of tomatoes from the local Italian social club.


2. Wash and cut the tomatoes

This part is where most of the effort is spent!
We use large plastic tubs, fill them with two thirds water and empty some tomatoes in. We then pull out a tomato one by one, cut it in half and then cut the hard stem out from the middle, putting all the stems in the compost bin and the washed, cut tomatoes in another bucket. This makes it easier to mince later, but also gives us a chance to inspect the tomato to ensure the inside isn't rotten.
Rotten tomatoes are easy to spot, they are either black on the inside or they stink! If ever you're not sure, giving it a smell is normally the easiest way to tell - and "When in doubt, throw it out".


3. Pre-boil them if they are firm

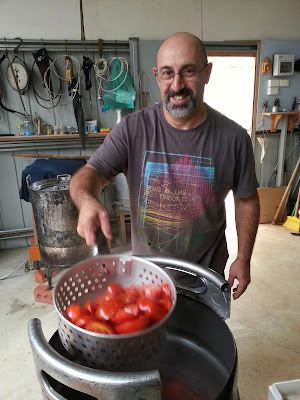
"Sauce tomatoes" are normally very ripe and soft, but sometimes they are quite firm. If this is the case they won't go through the mincer as well. So to help with this, we used a couple of large drums filled with water on a flame to lightly boil them a little. The idea is to only soften them up, so once the skin starts peeling off, you can pull them out of the water and drain them to remove as much as the water as possible (otherwise the sauce will be watery).

Pre-boiling the tomatoes
4. Mince the tomatoes

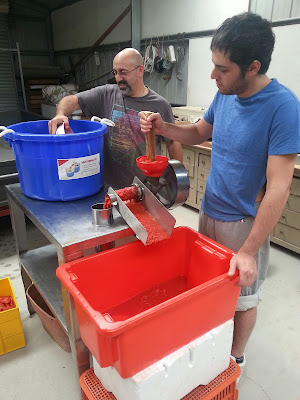
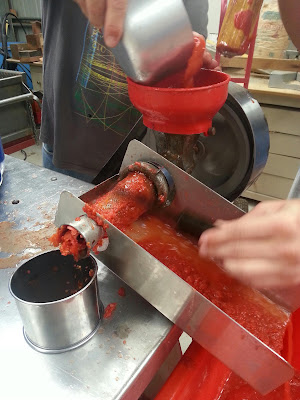
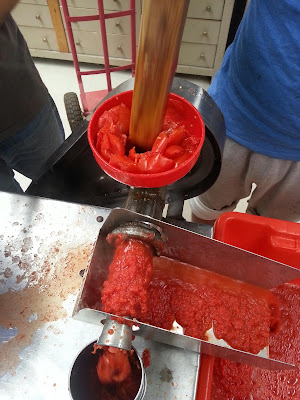
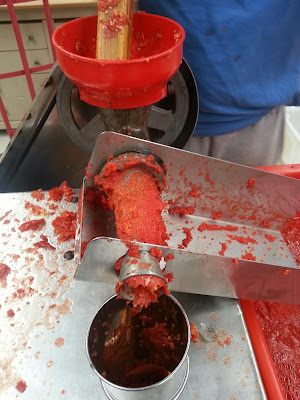
Now that the tomatoes are soft, washed and cut they can be minced. We scoop out some tomatoes and put them in the mincer. The mincer will separate the tomato sauce from the skin and the seeds. We generally fill one tub at a time.

The machine!
Separating the skin, seeds, etc. from the sauce
Gently pushing the tomatoes down in to the mincer
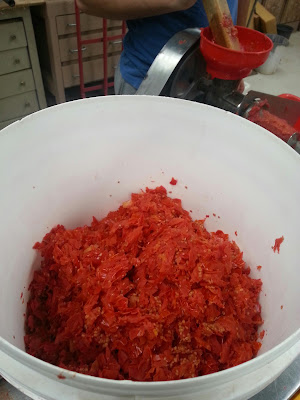
The left over skin, seeds, etc. from the mincer
5. Second mince

Once you have a (mostly) full tub of sauce, we actually put the left over skin and seed back through one more time and mix it with the rest of the sauce in the tub. This produces a thicker consistency and really gets the most out of the tomatoes. Be sure to mix the tub up well, otherwise the consistency will not be evenly spread.

The second run - putting the left overs back through one more time
6. Bottling the sauce

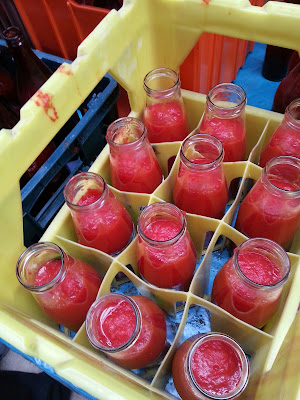
This year we used three different types of bottles: The usual large beer bottles with bottle caps, large jars with screw on lids and for the first time we tried using a few small (crown lager) beer bottles.
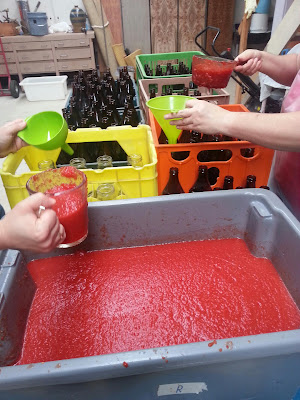
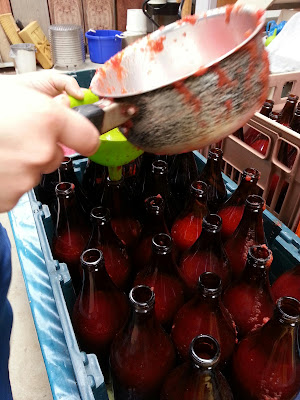
The first step is to put a spoon of salt and two basil leaves in each bottle, then fill the bottles with the sauce, leaving at least 5cm of an air gap from the top of the bottle.
Throughout the year, we collect up the beer bottles so we can re-use them for the next year. Be careful of this though, the bottles shouldn't be reused for more than about three times or so. Every time they are boiled, the bottles get weaker, so if they are reused too many times, they will eventually shatter when they are boiled.

Filling the bottles with the sauce
The beer bottles we use for the sauce
The jars we use for the sauce
7. Cap the bottles

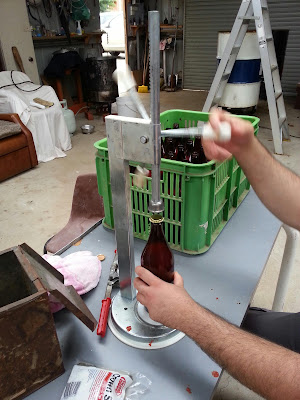
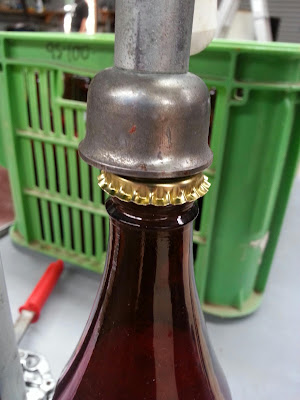
The jars with the screw on lids are the most risky. They need to be sealed tightly, otherwise they will not preserve correctly and will make a mess in the final stages. The beer bottles on the other hand are more reliable. You can buy bags of new bottle caps fairly cheaply and then using a "capper", they normally seal quite well. Just be sure to check they are tight as you go.

The 'capper'

8. Boil the bottles

After the sauce bottles are all sealed and ready to go, they are gently placed in a drum where they are boiled. We generally put a blanket in the bottom of the barrel, then a layer of bottles standing upright, then another blanket, another layer of bottles, etc. Then fill the drum with water and turn the flame on. As this is a large volume to heat up, it takes quite a while to start to boil, but once the boiling and/or steaming has started, we keep the flame on for another two hours. It's very important that once they have boiled for two hours that you leave them in the water until the water goes cold - this could be a whole day. Taking them out too early can cause the bottles to shatter.
This process is what preserves and seals the bottles properly.

Boiling the bottles to seal and preserve them
9. Enjoy!

After the water has gone cold, the bottles can be pulled out and put away. We try to make enough to last us a whole year, so we put them into crates, keep one crate in the kitchen and store the rest of them in a cool place.
When you want to use the sauce, it still needs to be cooked, so you can experiment with different recipes at the time - you can add your herbs, spices, wine, etc. and let it cook for anywhere between half an hour and two hours.

Now you know exactly what goes into your sauce, no preservatives and in my opinion, it tastes so much better than the ready made sauces from the shops that you'll never want to buy that stuff again!
Posted by Steve at 23:13 0 comments
Email This BlogThis! Share to X Share to Facebook

Script to transfer photos in linux

Every time I go on holiday, I end up writing the same bash script! ... I know, how nerdy is that, I code on holidays.

I really should save the script and bring it with me each time, instead I just re-invent the wheel everytime, so I thought I would write a quick post to record it for next time.
Luckily it's a really simple script to write, all it does is move the photos from my camera's memory card to the laptop HDD, but it puts them in a sub-directory for that particular day, then sorts the files into a 'jpg' or 'raw' sub-directory.

The script is quite dumb, it just creates a directory for the current date. On one of the trips, I had the script pull the date the photo was taken from the EXIF information, but when a series of photos goes over mid-night, it splits them up and I didn't really like that.
Posted by Steve at 03:38 0 comments
Labels: bash , photography Email This BlogThis! Share to X Share to Facebook

A few photography tips

A little while ago, my brother got me a photography course as a gift, so I asked a friend of mine, Amy, to join me and last Thursday night we attended the course. The course was a "Night Landscape" tutorial where we all brought our own cameras and a professional photographer guides us through how to take photos at night. The class was quite small, it consisted of Amy and I with one other student.

The course started out quite basic and we went though some fundamental theory, a lot of which Amy and I already knew, but the other student was a little less experienced so the photographer needed to cater for all of us.
Luckily it was just a small class, because instead of following the standard course structure, the photographer spent more time in conversations with us, answering all our specific questions.

Being self-taught, I am grateful for that, because these conversations were what lead me to learn a few new things that I hadn't picked up in my own research so far. Here is a quick summary of the things I learned:


1. Blowing out the sky, intentionally

The first new tip I learned was a trick the photographer used when the scene has an unusable sky, such as a dull cloud cover (like last night in the rain). He would take another photo that was intentionally over-exposed so the sky was as white as possible. By doing this, afterwards in Photoshop a pure white sky is very easy to select, even through the leaves of a tree or someone's hair using tools like the magic wand, or a color-based selection and can be replaced with a more dramatic sky from another shoot.


2. Hand-holding at night

At night, it is normally quite hard to take photos without blurring the shot unless you have a tripod, but there is a simple rule of thumb that can help with selecting an appropriate shutter speed:
"Make the denominator of the shutter speed match the focal length"
So if you are shooting at a 20mm focal length, the shutter speed should be about 1/20. Of course, this isn't a perfect rule, but it is a great place to start and you can adjust from there.


3. Freezing human motion

So the previous tip will make it easy to minimize any blur from yourself when holding the camera, but that wont help with people in your shot moving around. Well this photographer recommends a shutter speed of 1/125 as a baseline to freeze human motion. It turns out that most movement from people is slow enough for this shutter speed to capture it sharply, and of course you can adjust as necessary.


4. Filters to allow for more creativity

So far the only filters I have used are a "Circular Polariser" to enhance sky's, cut out reflections, etc. and a "UV" filter to protect the lens. Our photographer had quite an impressive set of filters and gave us a demo of his "Neutral Density" (or "ND") filter and a "Graduated Blue-Yellow" filter.
Long exposures can look really good at night, but they are normally impossible during the day, but with the ND filter, not much light gets through, so long exposures are needed even during the day. Our photographer had a street art photo with blurred clouds and deep dark colors in the middle of the day - it looked fantastic!
The "Graduated Blue-Yellow" filter changes the color of the light that comes through, and in this case, it enhances the blue colors of a sky at the top of the shot and the earthy yellow tones of the ground on the bottom of the shot. I had only ever known these colors to be improved like this with the use of software, but these filters had a great effect straight from the camera.


So at the end of the day, the course was quite basic, but in our tangential conversations I gained some pretty cool tips and tricks.
I think the most valuable aspect of a course like this is not so much the material presented, but just to experience another photographers style. It's always interesting to see how everyone thinks about things in their own unique way, and going through other peoples photos with a conversation is really intriguing.

Thanks to Rob and Sarah for the gift and Amy for keeping me company!
Posted by Steve at 00:44 0 comments
Labels: photography Email This BlogThis! Share to X Share to Facebook

Bluetooth audio streaming from phone to Ubuntu

I was toying with the idea of making my own "Car Computer" and one of the crucial parts is a Bluetooth connection, but not for P2P file transfer (although that could be useful), I would want this computer to appear the same way a Bluetooth stereo or headset does, so once connected it will stream the audio from my phone through the car speakers. Turns out it's quite easy with Ubuntu :)

PulseAudio is pretty awesome!
First step is ensure Pulse has the Bluetooth module loaded (mine did by default), you can check this by looking at this file /etc/pulse/default.pa

The next step is to configure the Bluetooth daemon to enable "Source" (and/or "Gateway" mode).
To do this, I added the following line to /etc/bluetooth/audio.conf:

Enable=Gateway,Source,Socket

Then restart the Bluetooth daemon:
$> sudo service bluetooth restart


Now you'll have to pair the computer with the phone as per normal.

Once the devices are paired, an "Audio Source" connection needs to be created.
For this, the easiest way is via DBus, but so we don't have to write a script and easy way to test this in an ad-hoc manner is to use a tool called 'd-feet', which is available in the Ubuntu repos.
$> sudo apt-get install d-feet

Using d-feet, navigate to the system bus and find the org.bluez key.
In here, there will be another key that has a device number in it. (for me this was /org/bluez/1002/hci0/dev_xx_xx_xx_xx_xx_xx)
Under this key, execute org.bluez.AudioSource > methods > Connect() without any parameters and your phone should now indicate that it is connected to the computer as an audio device.

At this point, I started playing some music so I could tell when it was working, but you probably won't be able to hear anything just yet.
That is because Pulse does not automatically send every source to every output - that could get messy!
To configure pulse to send the audio from the Bluetooth connection to your speakers you need to determine the name of the audio source and the name of the "sink" (or output) and join them together.
You can do this with the PulseAudio shell like this:

$> pacmd
>>> list-sources
>>> list-sinks
>>> load-module module-loopback source=bluez_source.xxxx sink=alsa_output.pci-xxxx

(Replace the underlined parts with the names from the preceding two commands)

Now all audio from your phone should be streaming through your computer.
DBus makes it really simple to do this programmatically, so it could easily be (mostly) automated and even controlled by a nice touch friendly GUI to pick the source device, etc..

I thought I would write up a quick post on this because when I finally got my music streaming through my laptop, it was exciting to know that I could actually use this to make a car computer with bluetooth functionality quite easily.
I used "AudioSource" in this example, but the other fun option is the "HandsFreeGateway", where instead of streaming stereo sound for music, it will also connect the microphone from the computer to the phone to be used in-call, etc.

The resources that helped me with this where:
http://jprvita.wordpress.com/2009/
http://ubuntuforums.org/showthread.php?t=1464189
http://ubuntuforums.org/showthread.php?t=1904447
Posted by Steve at 22:27 5 comments
Email This BlogThis! Share to X Share to Facebook

Changing the default boot option with GRUB2

Gone are the days of the nice /boot/grub/menu.lst file, but with new tools comes new features.


Changing the default boot item

In Grub2 you can change the default boot entry by editing the /etc/default/grub file.
In this file you'll see something like this near the top:
GRUB_DEFAULT=0
#GRUB_HIDDEN_TIMEOUT=0
GRUB_HIDDEN_TIMEOUT_QUIET=true
GRUB_TIMEOUT=10
GRUB_DISTRIBUTOR=`lsb_release -i -s 2> /dev/null || echo Debian`
GRUB_CMDLINE_LINUX_DEFAULT="quiet splash"
GRUB_CMDLINE_LINUX=""

The first line above tells Grub to boot the first boot entry by default (menu item with index 0).
You can simply change this to menu entry you prefer, but whenever you make any change to this file you need to run the following command to make the changes take effect:
$> sudo update-grub

Changing the default boot entry from the command line

A new feature that Grub2 provides is to change this option dynamically from the command-line.
In order for this to work, instead of setting the GRUB_DEFAULT option to the desired index, set it to 'saved' instead, like this:
GRUB_DEFAULT=saved

And run update-grub to make the changes take effect:
$> sudo update-grub

Now you can use the grub-set-default and the grub-reboot commands.
Both commands take the index of the boot entry you want as a command line argument:

$> grub-set-default <entry>
This command will permanently set the default boot entry to the index specified on the command line, useful if you tend to change the default regularly.

$> grub-reboot <entry>
This command will reboot the machine and boot into the specified boot entry, but only that once. The following boot will use the default.
Posted by Steve at 21:33 2 comments
Labels: linux , ubuntu Email This BlogThis! Share to X Share to Facebook
Older Posts

Blog Archive

  • ▼  2013 (4)
    • ▼  June (1)
      • Printing over previously printed characters and lines
    • ►  May (1)
    • ►  March (1)
    • ►  January (1)
  • ►  2012 (17)
    • ►  December (1)
    • ►  October (1)
    • ►  September (2)
    • ►  August (2)
    • ►  July (1)
    • ►  May (2)
    • ►  April (2)
    • ►  March (3)
    • ►  February (3)
  • ►  2011 (33)
    • ►  December (1)
    • ►  November (3)
    • ►  October (3)
    • ►  September (4)
    • ►  August (3)
    • ►  July (4)
    • ►  June (6)
    • ►  May (6)
    • ►  April (3)

Labels

android (5) apache (1) arch linux (1) arduino (1) bash (11) calendar (1) compiz (1) design (1) diff (1) email (1) gimp (1) git (3) github (2) gnome3 (1) Google (2) hacking (1) hardware (4) howto (1) htpc (1) java (1) lamp (1) linux (28) Mac (2) minecraft (2) mysql (1) netduino (1) nfs (1) parallel port (1) patch (1) photography (4) php (1) pidgin (2) printer (1) programming (6) python (1) rails (1) regex (5) review (3) ruby (3) Samsung Galaxy S3 (2) Samsung Series 9 (1) security (1) sed (3) ssh (1) sudo (1) tank (2) Toshiba Portege (1) troubleshooting (1) ubuntu (16) ui (2) unity (2) vim (5) webcam (1) websites (3) xbmc (1) xclip (1) xul (1)

Total Pageviews

Sparkline
 
Copyright (c) 2010 Steven Occhipinti. Designed by Conveyancing
High Deductible Health Insurance, Purchase Beats, Download Marketing Pictures