


If you saw my last post, you would have seen that I recently bought a 13" Samsung Series 9 ultrabook - I still think these machines are stunning!
The problem
There are a couple of little complaints floating around about the Samsung, like heat output, easily finger-printed chasis, but none of these really bother me, but there is one thing that does... alot... and its the wifi!
I could be using the laptop in the next room from my wireless router and it would dropout completely or go incredibly slow, if I move to the other side of the house where my bedroom is, my phone will have full reception, but this laptop will not see the wifi network at all - and this in unacceptable.
The transition
After returning the laptop (twice) I eventually asked for my money back so I could go purchase my second preference - the Macbook Air.
Unfortunately, the shop would not give me a full refund and could only offer me a credit note.
I tried to explain that no other units in store could offer me the same specs that I was after, the Samsung's best competition is the Macbook Air, but as they couldn't help me I asked to see what else they have in a light 13".
The sales guy showed me an Asus Zenbook and a new product which had just arrived to their store, the Toshiba Portege Z830.
I was lucky enough to be the first to see this at their store and even got to open the display model and check it out.
The decision between the two was tough!
The Asus Zenbook had a very sturdy exterior and had a similar tapered
design to the Macbook Air while the Toshiba Portege had a business feel
to it, but was slightly lighter and thinner.
They were both similarly spec'ed with Core i5's, 128GB SSD's and 4GB of RAM, but there were a few notable differences between them.
Although the Asus Zenbook does not have a backlit keyboard and has reduced size ports, it does has a higher resolution screen than the Samsung and Toshiba, but like the Mac it's a glossy screen. I personally prefer matte screens because even in brightly lit areas or even outside in direct sunlight, the screen is alot more visible.
The Toshiba Portege has a matte screen, backlit keyboard, has a full size HDMI port, VGA port, Ethernet port, 2x USB 2.0 ports, 1x USB 3.0 port and SD card reader and its thinner and lighter. Toshiba also give a 3 year warranty out-of-the-box with this model.
The screen is quite a bit more flimsy than the others and the system fan does tend to groan a little (compared to the Samsung at least), but this is probably all I can complain about.
The solution
I took a day to think about it and eventually made up my mind for the Portege.
In the US, there is an i7 variety with 6GB of RAM, but I don't really want to wait for it to get here.
I took a look at a comparison between the i7 from the Samsung and the i5 from the Toshiba, and while I would have paid the extra for the i7, I don't think I'll really notice the difference in most scenarios.
It seems I am not the only one who ended up swapping a Samsung Series 9 for a Toshiba Portege Z830 either, I came across this blog post where the author goes into more detail and provides results of quite specific tests.
In the end I paid $1539 for the laptop with a 3 year warranty and then an extra $79 to upgrade it to 6GB of RAM.
While it's no Samsung Series 9, its pretty nice and the cut in performance saved me a little more than $600.
13" Core i7 Samsung Series 9 Ultrabook
Back in my first year of uni, I bought one of the early Core Duo (not Core 2 Duo) 15" Asus laptops which at the time was great and it had a decent graphics card for games, etc.
Roughly 6 years later, its showing its age. The battery lasts less than an hour now, it weighs about 3kg not including the adapter and performance is lacking compared to todays technology.
After a recent shoulder injury and a busy week that involved me carrying my laptop from place to place, I decided it was time to reward myself with an early Christmas present and buy a new machine.
My requirements were:
Asus u-Series
The Asus machines, as usual, had a very good bang-for-buck, a nice thickness of 19mm and unlike most others, some models had full size video output and ethernet plugs.
While the price and size were right, the highest spec'ed machines were not quite as impressive as its competition. If budget was the number one concern, the Asus u-Series and Zenbook range offer pretty good value.
Macbook Air
I have never been a "Mac person" due to the traditional heavy pricing and proprietary nature of alot of their products, but these days (after some convincing) I believe the hardware and even price does have a surprisingly strong position in the competition.
The 13" Macbook Pro and Macbook Air both had very good specs to offer for around the $2000 price tag, both with Core i7's, 4-8GB RAM and SSD's, not to mention pretty attractive packaging.
After seeing a Macbook Air up close, I really liked how the thickest point is about 17mm or so at the back but it tapers off to next to nothing at the front.
So the model I chose for comparison purposes was worth $1928.99 and had the following specs:
The operating system did not bother me too much either as I intended to be running Linux as my primary OS anyway, but having a Mac would give me more familiarity with OSX which would be helpful considering its popularity in my line of work.
The minor annoyances would be: expensive adapters for video and ethernet ports, unfamiliar keyboard layout (command key where alt should be, etc), non-upgradeable ram, glossy screen, etc. - but those are pretty minor.
Samsung Series 9
I found these ultrabooks to have a very unique look and one of the first well thought out, thin designs that are not just another Mac look-a-like.
The sales pitch always includes a spiel about its "Duralumin"- which is a light and strong material used in aircrafts and while it looks stunning and adds sophistication and uniqueness to the overall design on the unit, this material along with the black plastic are both fingerprint magnets!
The specs of the Series 9 unit I used for comparison (and ultimately bought) was quite good:
The one big catch with this system is the RRP of ~$2700, while most Aussie shops sold them for ~$2500. This made me consider the Mac even more!
But during my research I saw MLN's price drop down to a much more attractive $1997 and immediately rang them to find out more details and how long the special would last. It turns out that Samsung are starting to phase them out of stores (presumably to make way for a new product next year) and naturally they had sold alot of units and only had a few left.
I did a bit more research and found that to save space, the ports are hidden behind very aircraft-like flaps, but as with the Mac, they are reduced size ports.
The video output is provided in the form of a micro-HDMI port - which is at least a more common format and I don't need to go through apple.com.
The other space-saving trade-off was a (sadly) proprietary ethernet port that comes bundled with an adapter to convert it to RJ45 - but unlike the Mac where you need to buy a USB network adapter, this actually has the network card built in, it just has an unusual plug - which I don't intend to use much anyway.
Another plus is this model comes with 1x USB 3.0 port (and a 2.0 port) which is great considering the speeds my brother gets with his USB 3.0 flash drive.
So I went to MLN and inspected the unit up close and what eventually made my decision for the Samsung was that for about the same price I get a machine with double the RAM (handy for VMs), a windows licence for portable gaming and a bunch of freebies from MLN including the HDMI to micro-HDMI cable, a set of Sennheiser headphones and a padded sleeve to carry it.
I was able to get the cable and sleeve free because I opted to purchase the extended 3 year pickup warranty for an additional $180ish and the headphones were a Christmas present :)
Initial impressions are very positive, the screen is incredibly bright and vibrant and with a smooth matte finish, I have had no issues using it outdoors.
The backlit keyboard is quite nice too, although the brightness of this light is controlled via windows drivers, so in linux (at this stage) I cant control its brightness.
The touchpad is large and seems to employ the same technique as the Mac Magic Mouse where there is one click-able button (the lower part of the pad) and depending on where your finger is when you click determines a right or left mouse click and once again, this doesnt work in Linux out of the box, but the standard 2 finger tap works as per normal.
Using Ubuntu 11.10 the rest of the hardware works out of the box, so no need to fiddle with drivers for network, graphics, webcam, etc.
Overall I am very happy with my purchase and its a huge step up from my old 15.4" 3kg laptop!
Roughly 6 years later, its showing its age. The battery lasts less than an hour now, it weighs about 3kg not including the adapter and performance is lacking compared to todays technology.
After a recent shoulder injury and a busy week that involved me carrying my laptop from place to place, I decided it was time to reward myself with an early Christmas present and buy a new machine.
My requirements were:
- 13" screen
- As thin and as light as possible to aid portability
- Powerful enough to do almost anything my daily activities could involve
- <~ $2000
Asus u-Series
The Asus machines, as usual, had a very good bang-for-buck, a nice thickness of 19mm and unlike most others, some models had full size video output and ethernet plugs.
While the price and size were right, the highest spec'ed machines were not quite as impressive as its competition. If budget was the number one concern, the Asus u-Series and Zenbook range offer pretty good value.
Macbook Air
I have never been a "Mac person" due to the traditional heavy pricing and proprietary nature of alot of their products, but these days (after some convincing) I believe the hardware and even price does have a surprisingly strong position in the competition.
The 13" Macbook Pro and Macbook Air both had very good specs to offer for around the $2000 price tag, both with Core i7's, 4-8GB RAM and SSD's, not to mention pretty attractive packaging.
After seeing a Macbook Air up close, I really liked how the thickest point is about 17mm or so at the back but it tapers off to next to nothing at the front.
So the model I chose for comparison purposes was worth $1928.99 and had the following specs:
- 1.8GHz Dual-Core Intel Core i7
- 4GB 1333MHz DDR3 SDRAM
- 256GB flash storage
- Mini DisplayPort to DVI adapter ($30)
The operating system did not bother me too much either as I intended to be running Linux as my primary OS anyway, but having a Mac would give me more familiarity with OSX which would be helpful considering its popularity in my line of work.
The minor annoyances would be: expensive adapters for video and ethernet ports, unfamiliar keyboard layout (command key where alt should be, etc), non-upgradeable ram, glossy screen, etc. - but those are pretty minor.
Samsung Series 9
I found these ultrabooks to have a very unique look and one of the first well thought out, thin designs that are not just another Mac look-a-like.
The sales pitch always includes a spiel about its "Duralumin"- which is a light and strong material used in aircrafts and while it looks stunning and adds sophistication and uniqueness to the overall design on the unit, this material along with the black plastic are both fingerprint magnets!
The specs of the Series 9 unit I used for comparison (and ultimately bought) was quite good:
- 1.5GHz Core i7
- 8GB RAM
- 256GB SSD
- Micro-HDMI to HDMI adapter ($15)
The one big catch with this system is the RRP of ~$2700, while most Aussie shops sold them for ~$2500. This made me consider the Mac even more!
But during my research I saw MLN's price drop down to a much more attractive $1997 and immediately rang them to find out more details and how long the special would last. It turns out that Samsung are starting to phase them out of stores (presumably to make way for a new product next year) and naturally they had sold alot of units and only had a few left.
I did a bit more research and found that to save space, the ports are hidden behind very aircraft-like flaps, but as with the Mac, they are reduced size ports.
The video output is provided in the form of a micro-HDMI port - which is at least a more common format and I don't need to go through apple.com.
The other space-saving trade-off was a (sadly) proprietary ethernet port that comes bundled with an adapter to convert it to RJ45 - but unlike the Mac where you need to buy a USB network adapter, this actually has the network card built in, it just has an unusual plug - which I don't intend to use much anyway.
Another plus is this model comes with 1x USB 3.0 port (and a 2.0 port) which is great considering the speeds my brother gets with his USB 3.0 flash drive.
So I went to MLN and inspected the unit up close and what eventually made my decision for the Samsung was that for about the same price I get a machine with double the RAM (handy for VMs), a windows licence for portable gaming and a bunch of freebies from MLN including the HDMI to micro-HDMI cable, a set of Sennheiser headphones and a padded sleeve to carry it.
I was able to get the cable and sleeve free because I opted to purchase the extended 3 year pickup warranty for an additional $180ish and the headphones were a Christmas present :)
Initial impressions are very positive, the screen is incredibly bright and vibrant and with a smooth matte finish, I have had no issues using it outdoors.
The backlit keyboard is quite nice too, although the brightness of this light is controlled via windows drivers, so in linux (at this stage) I cant control its brightness.
The touchpad is large and seems to employ the same technique as the Mac Magic Mouse where there is one click-able button (the lower part of the pad) and depending on where your finger is when you click determines a right or left mouse click and once again, this doesnt work in Linux out of the box, but the standard 2 finger tap works as per normal.
Using Ubuntu 11.10 the rest of the hardware works out of the box, so no need to fiddle with drivers for network, graphics, webcam, etc.
Overall I am very happy with my purchase and its a huge step up from my old 15.4" 3kg laptop!
Removing geotag data from JPGs
Just a quick note, these days most cameras automatically geotag photos which is pretty cool, especially when taking travel photos, but sometimes you may not want everyone to know where a photo was actually taken.
For example, a photo of your backyard could give away your home address which is probably not a great thing.
Its really easy to clear the geotag data with a great little tool called exiftool.
I used this tool in an earlier blog post too and I find it really useful!
To install exiftool in Ubuntu:
Then executing exiftool followed by a jpg filename will output a whole bunch of exif data for you - some of which may have geolocation data:
The clear this geotag data out, simply issue this command:
For example, a photo of your backyard could give away your home address which is probably not a great thing.
Its really easy to clear the geotag data with a great little tool called exiftool.
I used this tool in an earlier blog post too and I find it really useful!
To install exiftool in Ubuntu:
$> sudo apt-get install libimage-exiftool-perl
Then executing exiftool followed by a jpg filename will output a whole bunch of exif data for you - some of which may have geolocation data:
$> exiftool image.jpg
ExifTool Version Number : 8.60
File Name : image.jpg
Directory : .
File Size : 14 kB
...
The clear this geotag data out, simply issue this command:
$> exiftool -gps:all= image.jpg
Motion detection
The way my desk is positioned means that when I'm on my computer I face the corner of the room, which means the door is behind me.
Quite often I'll stay up late working away till early hours of the morning and usually music comes hand-in-hand with coding (for me anyway), so when it's late, I use headphones so I don't disturb anyone else.
This has caused me some grief as sometimes someone will come into my room for whatever reason and find me with my back to the them and headphones in, so knocking at the door or saying my name does not get my attention.
This leaves the last resort of tapping me on the shoulder which scares the crap out of me!
A while ago I invested in a convex mirror designed to go on your computer screen so you can see who's coming up from behind.
Well, with a 24-inch screen and deep concentration, this small mirror doesn't catch me eye at all, so I still hit the ceiling when someone taps me on the shoulder.

For my birthday I got this amazing Astro A40 headset. Sound clarity is absolutely stunning, they are really comfortable to wear and they block out a lot of surrounding background noise.
While I absolutely love the headset and wear it all the time, you can probably guess this adds to my jumpy-ness!
So I finally found a solution!
There is a package in the Ubuntu repositories called "motion" - which is a really simple motion detection server that utilises a webcam.
I had a look at "zoneminder" too, but it seems very over-kill for my needs.
motion will detect movement (above a configurable threshold), store "movement" snapshots and video files, log to a database and more importantly it provides a few hooks to fire commands upon events such as on_event_start, on_motion_detected, etc.
I disabled almost every option except the on_event_start hook.
This hook will execute the given command when motion has been detected after a (configurable) "gap" period of time of no motion - which I set to 10 seconds.
The command I set it to execute is this:
As mentioned in an earlier blog post, notify-send can be found in the libnotify-bin package
Note: the --hint=int:transient:1 is for Gnome-Shell which has introduced persistent notifcations and I didn't want to acknowledge a notification everytime someone walks past!
The end result of this little hack is when someone walks anywhere near my doorway, that command gets my attention with a standard Gnome-Shell notification from the bottom of the screen like this:

The reason I am using sudo here is that motion needs to be run as root, and so the notify-send command will also be run as root.
I guess because I had Unity installed before Gnome-Shell, when root runs notify-send, I get the Unity style notifications - which is still nice, but as I'm road testing Gnome-Shell, I figured I may as well use its notification look-n-feel too.
Here's what it looks like if you leave out the sudo -u steve part:

Quite often I'll stay up late working away till early hours of the morning and usually music comes hand-in-hand with coding (for me anyway), so when it's late, I use headphones so I don't disturb anyone else.
This has caused me some grief as sometimes someone will come into my room for whatever reason and find me with my back to the them and headphones in, so knocking at the door or saying my name does not get my attention.
This leaves the last resort of tapping me on the shoulder which scares the crap out of me!
A while ago I invested in a convex mirror designed to go on your computer screen so you can see who's coming up from behind.
Well, with a 24-inch screen and deep concentration, this small mirror doesn't catch me eye at all, so I still hit the ceiling when someone taps me on the shoulder.

For my birthday I got this amazing Astro A40 headset. Sound clarity is absolutely stunning, they are really comfortable to wear and they block out a lot of surrounding background noise.
While I absolutely love the headset and wear it all the time, you can probably guess this adds to my jumpy-ness!
So I finally found a solution!
There is a package in the Ubuntu repositories called "motion" - which is a really simple motion detection server that utilises a webcam.
I had a look at "zoneminder" too, but it seems very over-kill for my needs.
motion will detect movement (above a configurable threshold), store "movement" snapshots and video files, log to a database and more importantly it provides a few hooks to fire commands upon events such as on_event_start, on_motion_detected, etc.
I disabled almost every option except the on_event_start hook.
This hook will execute the given command when motion has been detected after a (configurable) "gap" period of time of no motion - which I set to 10 seconds.
The command I set it to execute is this:
sudo -u steve notify-send --hint=int:transient:1 -i '/usr/share/icons/hicolor/scalable/mimetypes/text-x-apport.svg' 'LOOK BEHIND YOU!'
As mentioned in an earlier blog post, notify-send can be found in the libnotify-bin package
Note: the --hint=int:transient:1 is for Gnome-Shell which has introduced persistent notifcations and I didn't want to acknowledge a notification everytime someone walks past!
The end result of this little hack is when someone walks anywhere near my doorway, that command gets my attention with a standard Gnome-Shell notification from the bottom of the screen like this:
The reason I am using sudo here is that motion needs to be run as root, and so the notify-send command will also be run as root.
I guess because I had Unity installed before Gnome-Shell, when root runs notify-send, I get the Unity style notifications - which is still nice, but as I'm road testing Gnome-Shell, I figured I may as well use its notification look-n-feel too.
Here's what it looks like if you leave out the sudo -u steve part:

Disabling the Unity global menu
The Unity global menubar in Ubuntu can take a bit of getting used to, especially if you don't come from a Mac background, but once you do, the screen real estate saving is quite nice, especially on small screens like my eeepc.
But sometimes it can be frustrating!
For example, if you use The Gimp, alot of its functionality is in the menu, but for that to show, you must have the main window (the one with your work in it) focused, but whenever you select a tool from the toolbox, that window loses focus, and therefore you can't get to the menu.
I know all it takes is a click in the main window and then a click on the global menu, but this can get quite annoying.
Thankfully, there is an off-switch in the form of an env-var which you can either add to your profile to completely disable it, or just prefix it before you run commands like gimp.
All you need to do to disable it is set this:
I made an alias so its easier to remember:
Note that typing (or shouting) dam gimp is not only to relieve the frustration of the global menubar, but it also stands for "Disable AppMenu" :)
There is a full write up with more details over at webupd8.org
But sometimes it can be frustrating!
For example, if you use The Gimp, alot of its functionality is in the menu, but for that to show, you must have the main window (the one with your work in it) focused, but whenever you select a tool from the toolbox, that window loses focus, and therefore you can't get to the menu.
I know all it takes is a click in the main window and then a click on the global menu, but this can get quite annoying.
Thankfully, there is an off-switch in the form of an env-var which you can either add to your profile to completely disable it, or just prefix it before you run commands like gimp.
All you need to do to disable it is set this:
UBUNTU_MENUPROXY=0
I made an alias so its easier to remember:
alias dam='UBUNTU_MENUPROXY=0 '
Note that typing (or shouting) dam gimp is not only to relieve the frustration of the global menubar, but it also stands for "Disable AppMenu" :)
There is a full write up with more details over at webupd8.org
Recursive search with vimgrep
Usually when I need to find things in multiple files, I would use grep or ack from a terminal and then open those files in vim to do whatever it is that I have to do.
This is ok, but sometimes this can be a little annoying.
Vim has a :grep function which will use the system grep command, but it also has a :vimgrep function that is built in to vim.
I had left a bunch of TODO's through out my code as a reminder to come back to them, so using :vimgrep I was able to quickly jump between them:
This tells vim to search for the pattern "TODO" recursively from the current directory.
The "**/" means recursive and the "*" means any file - therefore "**/*.rb" would just search the ruby scripts.
The results are loaded into the "quickfix window". This means if you want to see all the occurences, you can open the list with :copen
Naturally, :cnext, :cprevious, :cfirst, :clast, etc. will allow you to jump between them or you can use the quicklist window and press enter on the filename, or in gvim you can even use the mouse.
In addition, I use Tim Pope's Unimpaired vim plugin,which provides the easy shortcuts '[q' and ']q' for :cprevious and :cnext (respectively)
This is ok, but sometimes this can be a little annoying.
Vim has a :grep function which will use the system grep command, but it also has a :vimgrep function that is built in to vim.
I had left a bunch of TODO's through out my code as a reminder to come back to them, so using :vimgrep I was able to quickly jump between them:
:vimgrep TODO **/*
This tells vim to search for the pattern "TODO" recursively from the current directory.
The "**/" means recursive and the "*" means any file - therefore "**/*.rb" would just search the ruby scripts.
The results are loaded into the "quickfix window". This means if you want to see all the occurences, you can open the list with :copen
Naturally, :cnext, :cprevious, :cfirst, :clast, etc. will allow you to jump between them or you can use the quicklist window and press enter on the filename, or in gvim you can even use the mouse.
In addition, I use Tim Pope's Unimpaired vim plugin,which provides the easy shortcuts '[q' and ']q' for :cprevious and :cnext (respectively)
Ruby + parallel port + LEDs
In the initial R&D stages for our Tank Project we have to work out the most suitable way to interface from software to hardware - which I have never done before!
The parallel port
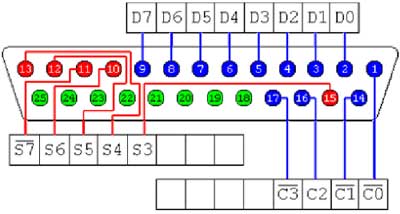
One of those options is to use the parallel port, which allows us 8 data pins that we can use for controlling motors, etc.
The layout of a parallel port is quite easy, there are 8 "D" pins for data with 8 matching "Ground" pins (shown in green below).
 The test rig
As the output from the parallel port is about 5 volts, I though LED's were a suitable was of testing this out, so I went searching through our garage to find a parallel cable from an old printer and a bunch of LED's.
I found a bunch of tristate LED's - tristates have 3 legs instead of 2 and provide 2 different colors depending on which legs have power to them.
For example, if the circuit connects the left leg and the middle leg, it produces green light, whereas the right leg and middle leg produce red light.
Soldering 4 of these LEDs to a board meant I could join all the middle legs together which would be what I connect the ground wire from the parallel port to and the other 8 legs to the 8 data wires.
The software
In order to control when each of the data pins has power to it or not, you simply have to write 8 bits (a byte) to the parallel port where each bit corresponds to a data pin.
In linux this is quite simple as you can write to /dev/port just like any other file.
To test this out, I wrote a little Ruby script to play a fancy little sequence a few times. The code is quite simple considering some other examples on the net:
The fun part!
So my computer doesn't have a parallel port, but we have some older machines that do. So I found an old pc and booted off a linux live distro that has ruby, plugged in the cable with the LEDs on it, and ran my script, and this is what happens:
The conclusion
This is the first time I have ever written a program that uses hardware, albeit really basic hardware, but this has a lot of potential.
Instead of turning on lights, this small current could trigger relays to do more exciting things, or in our case power transistors using PWM to control motor speed for our tank - and its so simple!
The parallel port
One of those options is to use the parallel port, which allows us 8 data pins that we can use for controlling motors, etc.
The layout of a parallel port is quite easy, there are 8 "D" pins for data with 8 matching "Ground" pins (shown in green below).
As the output from the parallel port is about 5 volts, I though LED's were a suitable was of testing this out, so I went searching through our garage to find a parallel cable from an old printer and a bunch of LED's.
I found a bunch of tristate LED's - tristates have 3 legs instead of 2 and provide 2 different colors depending on which legs have power to them.
For example, if the circuit connects the left leg and the middle leg, it produces green light, whereas the right leg and middle leg produce red light.
Soldering 4 of these LEDs to a board meant I could join all the middle legs together which would be what I connect the ground wire from the parallel port to and the other 8 legs to the 8 data wires.
The software
In order to control when each of the data pins has power to it or not, you simply have to write 8 bits (a byte) to the parallel port where each bit corresponds to a data pin.
In linux this is quite simple as you can write to /dev/port just like any other file.
To test this out, I wrote a little Ruby script to play a fancy little sequence a few times. The code is quite simple considering some other examples on the net:
The fun part!
So my computer doesn't have a parallel port, but we have some older machines that do. So I found an old pc and booted off a linux live distro that has ruby, plugged in the cable with the LEDs on it, and ran my script, and this is what happens:
This is the first time I have ever written a program that uses hardware, albeit really basic hardware, but this has a lot of potential.
Instead of turning on lights, this small current could trigger relays to do more exciting things, or in our case power transistors using PWM to control motor speed for our tank - and its so simple!
Git stash, diff and patch
I recently found myself in a situation where I need to comment out
certain lines in my code in order to test a particular set of features.
These commented out lines are only for my local development environment but will be useful in the future if this set of features needs work again.
In this situation, checking them into Git or making a personal .gitignore file are not suitable solutions.
I have found 2 good ways of accomplishing this:
Git stash:
Starting from a clean checkout, I put my temporary changes in place, then run this command:
Then I continue on with my work. I selectively leave these changes out of all my commits using git add -i then once everything is checked in except my temporary changes, I revert these temporary changes with git checkout -- . so I'm left with a clean repository.
When I need to work on a related feature again, I can list my stashes with:
Then, apply the most recent stash by running this command:
If you have more than one stash, you can specify which stash you want to apply on the command line. See git stash --help to see more information.
Git diff and patch:
diff and patch are very useful tools to be familiar with if you ever deal with text. Git's diff output is much the same, and so the patch tool is still very handy!
Starting from a clean checkout, I put my temporary changes in place, then run this command:
Then I continue on with my work. I selectively leave these changes out of all my commits using git add -i then once everything is checked in except my temporary changes, I revert these temporary changes with git checkout -- . so I'm left with a clean repository.
When I need to work on a related feature again, I can apply my patch by running this command from the project root:
Both of these methods will put my temporary work arounds in place again which saves me trying to work out which lines I needed to comment out everytime. Saving the stashes and/or patch files with descriptive names means you can find and re-use these temporary changes quite easily in the future.
These commented out lines are only for my local development environment but will be useful in the future if this set of features needs work again.
In this situation, checking them into Git or making a personal .gitignore file are not suitable solutions.
I have found 2 good ways of accomplishing this:
Git stash:
Starting from a clean checkout, I put my temporary changes in place, then run this command:
git stash save temp workaround for some issue
Then I continue on with my work. I selectively leave these changes out of all my commits using git add -i then once everything is checked in except my temporary changes, I revert these temporary changes with git checkout -- . so I'm left with a clean repository.
When I need to work on a related feature again, I can list my stashes with:
git stash list
Then, apply the most recent stash by running this command:
git stash apply
If you have more than one stash, you can specify which stash you want to apply on the command line. See git stash --help to see more information.
Git diff and patch:
diff and patch are very useful tools to be familiar with if you ever deal with text. Git's diff output is much the same, and so the patch tool is still very handy!
Starting from a clean checkout, I put my temporary changes in place, then run this command:
git diff > ~/patches/temp_workaround.patch
Then I continue on with my work. I selectively leave these changes out of all my commits using git add -i then once everything is checked in except my temporary changes, I revert these temporary changes with git checkout -- . so I'm left with a clean repository.
When I need to work on a related feature again, I can apply my patch by running this command from the project root:
patch -p1 < ~/patches/temp_workaround.patch
Both of these methods will put my temporary work arounds in place again which saves me trying to work out which lines I needed to comment out everytime. Saving the stashes and/or patch files with descriptive names means you can find and re-use these temporary changes quite easily in the future.
Code review workflow with GitHub
The more I use Git, the more I love it and less I prefer my once trusty SVN.
A while back I read the book "Pro Git" by Scott Chacon.
The book provides a really good explanation of how Git works and how to use it effectively.
I then found that this book is available online for free and it is now a commonly visited bookmark for me.
Recently my boss sent me a link to a blog post by Scott Chacon that explains the Git workflow that is used at GitHub on a daily basis as we are going to give it a go for our own projects.
In the post, Scott contrasts this to the commonly known "Git-Flow" and describes how they are both good, but Git-Flow is alot more involved, where the aptly known "GitHub-Flow" is a lot simpler and therefore easier to follow.
For full details, I highly recommend reading the post but basically it involves keeping a master branch that is always stable (and deployable) and using topic branches for development. Once a topic branch is tested locally you open a pull request to have others review it and merge it in to master.
Using pull requests within a single repository for code reviews are really useful!
It allows a discussion thread to take place, commenting on individual lines of code and keeps a history of the rational for any changes.
A good aspect of this approach is that these topic branches can be pushed to GitHub constantly as it will not affect anyone else's work, and allows the team to have visibility of who is working on what by simply looking at the branch list page.
This of course means that your branches should be descriptively named.
We have been using this workflow for a little while now and have felt compelled to make a small modification.
We have a staging environment which closely matches the production environment and is externally available to show clients new features, etc.
To cater for this we have introduced an additional long-term branch called "staging".
This doesn't affect our existing workflow for the majority of cases, but every now and then we will merge master into staging, then the topic branch into staging to test/preview/etc. (without the need for pull requests/code review). Once the change is tested/previewed in staging and proven to be good, a pull request is opened for the topic branch to be merged into master (as per usual).
One thing to note here is that it's the topic branch to be merged and not the staging branch. Although in most cases this wont matter, if multiple merges from staging into master occur it can become confusing. Also the merge commit description will contain "repo/staging" instead of something more descriptive, like "repo/bundler-upgrade".
I have really enjoyed using this workflow and it seems to be working quite well so far. In the process of implementing this you really get to see how useful GitHub can be with using pull requests for code reviews and the branch list and network graph features for visualising not only your own progress, but the entire project too.
GTalkSMS
Continuing on from my last post, I found another great use for Pidgin!
GTalkSMS is an Android app that turns your phone into a chat bot.
Here is an extract from the GTalkSMS website:
Although initially skeptical about security (it has the same functions as a would-be trojan) you have to be buddies with the bot to talk to it, so here is what I did...
Basic Setup:
Basic Usage:
With this done, once I start the bot, it will send me a instant message when I get an SMS, phone call or the battery state changes.
What is even better is that if I want to reply to a recently received SMS, I can send the bot an instant message like this:
If I want to initiate an SMS to someone else, I can send this command:
That will lookup mymate in my phonebook and send the SMS to them.
If you have multiple people with the same name, you can search your phonebook using this command:
This will list all the John's then you can just copy and paste the phone number you want in place of the name, like this:
Doing more:
There are heaps of commands available and you can get a list of them all at any time with this command:
Some other cool commands allow you to change your ringer volume, take a photo, share clipboards, get geolocation, launch a given URL in the browser and lots more.
It also has some options to make GTalkSMS start automatically when the phone boots, or when it is charging, or when its on wifi.
I personally only want this connected while I'm in front of my pc, so I have it set to start when charging and stop when not charging anymore (I use a USB charging dock at my desk).
One other noteworthy feature is the "Incoming SMS" setting "In separated conversations". When you receive an sms, not only does the bot send you an IM, but it will start a new "chat room" for that particular contact and send you an invite. From within this chat room, you dont need to worry about sending commands, whatever you send in there will be sent as an sms to that client. It makes it look seamlessly like any other chat.
Pidgin fun:
As you may already know, I like Pidgin because of its configurability.
I have Pidgin using the libnotify plugin, which means I get the fancy Ubuntu notifications from Pidgin, but I soon realised there are too many notifications by default (everytime a buddy signs in or out is a bit much with 4 chat accounts signed in at once!) - so I turned those notifications off.
But! I wanted these notifications to see when my phone is available to chat, so I set up some little recurring buddy pounces:
Now when I dock my phone, it starts charging, GTalkSMS starts up and signs in and I get this notification appear:

Then when I pull it off the dock, GTalkSMS signs out and I get this notification:

Note: The notify-send command is available from the libnotify-bin package, which can be installed in Ubuntu with this command:
GTalkSMS is an Android app that turns your phone into a chat bot.
Here is an extract from the GTalkSMS website:
GTalkSMS enables you to control your android phone through GTalk/XMPP (send/receive SMS, make calls, locate your phone, etc.). It can be useful for those who prefer typing sms on a real keyboard. The app also notifies you about new "events" on the phone, like a new text message (SMS) or an incoming call.
Although initially skeptical about security (it has the same functions as a would-be trojan) you have to be buddies with the bot to talk to it, so here is what I did...
Basic Setup:
- Downloaded and installed GTalkSMS from the market
- Created a google account for GTalkSMS
- Configured Pidgin with my personal gmail account (obviously)
- Added this new account as a buddy on my personal gmail account
- Configured GTalkSMS to send notifications to my personal gmail account
Basic Usage:
With this done, once I start the bot, it will send me a instant message when I get an SMS, phone call or the battery state changes.
What is even better is that if I want to reply to a recently received SMS, I can send the bot an instant message like this:
reply:Hey, I got your message
If I want to initiate an SMS to someone else, I can send this command:
sms:mymate:Hey, how you goin?
That will lookup mymate in my phonebook and send the SMS to them.
If you have multiple people with the same name, you can search your phonebook using this command:
contact:john
This will list all the John's then you can just copy and paste the phone number you want in place of the name, like this:
sms:04041111111:Hey John!
Doing more:
There are heaps of commands available and you can get a list of them all at any time with this command:
help:all
Some other cool commands allow you to change your ringer volume, take a photo, share clipboards, get geolocation, launch a given URL in the browser and lots more.
It also has some options to make GTalkSMS start automatically when the phone boots, or when it is charging, or when its on wifi.
I personally only want this connected while I'm in front of my pc, so I have it set to start when charging and stop when not charging anymore (I use a USB charging dock at my desk).
One other noteworthy feature is the "Incoming SMS" setting "In separated conversations". When you receive an sms, not only does the bot send you an IM, but it will start a new "chat room" for that particular contact and send you an invite. From within this chat room, you dont need to worry about sending commands, whatever you send in there will be sent as an sms to that client. It makes it look seamlessly like any other chat.
Pidgin fun:
As you may already know, I like Pidgin because of its configurability.
I have Pidgin using the libnotify plugin, which means I get the fancy Ubuntu notifications from Pidgin, but I soon realised there are too many notifications by default (everytime a buddy signs in or out is a bit much with 4 chat accounts signed in at once!) - so I turned those notifications off.
But! I wanted these notifications to see when my phone is available to chat, so I set up some little recurring buddy pounces:
- When my GTalkSMS account signs in, execute this command:
notify-send -i "/usr/share/pixmaps/pidgin/emblems/scalable/bot.svg" "Droid online" "Your Android is now contactable via GTalkSMS"
- When my GTalkSMS account signs out, execute this command:
notify-send -i "/usr/share/pixmaps/pidgin/emblems/scalable/unavailable.svg" "Droid offline" "Your Android has now signed off GTalkSMS"
Now when I dock my phone, it starts charging, GTalkSMS starts up and signs in and I get this notification appear:

Then when I pull it off the dock, GTalkSMS signs out and I get this notification:

Note: The notify-send command is available from the libnotify-bin package, which can be installed in Ubuntu with this command:
sudo apt-get install libnotify-bin
Meta-contacts in Pidgin
Pidgin is my IM client of choice, its one of the first things I replace in a stock installation of Ubuntu.
I chose Pidgin not because of a slick UI but because it has some really nice features!
The two features that stand out the most in my opinion are the "buddy pounces" and the many available plugins:
Buddy pounces:
For those that don't know about pounces, they are little predefined actions that can be triggered upon some configurable event, such as "when <SomeContact> returns from away status, open a conversation window", or "when <SomeContact> signs on, send them a predefined message".
Plugins:
Not only does Pidgin come with lots of plugins by default, but there are a lot of third party plugins available too.
There are basic ones that offer a more robust and configurable way of notifying you of messages, etc and some more fun ones like "psychic mode" - which listens for when a new contact starts typing a message to you and pops up a convo window before they have even sent it.
Meta-contacts:
The one thing that I missed from other IM clients was meta-contacts.
For example, at any one time I have Pidgin signed into my Google chat, MSN and Facebook chat accounts and for those friends of mine that have an account on all three platforms, they appear 3 times in my buddy list.
With meta-contacts you can collapse those 3 contacts into just one.
Well, it turns out this feature has been in Pidgin for quite a while, I just never noticed as its just not quite as obvious as with other clients.
How to use meta-contacts in Pidgin:
To use this feature, all you have to do is right-mouse click on the contact and click "expand" and drag and drop other contacts under the newly expanded name.
You should put the most common account at the top as that is the account is used by default when you double click the contact.
Even though these features aren't exactly ground breaking, when you get used to having them there it becomes a little harder to go back to clients without them.
Poweroff without a password
Ever find it strange that in Ubuntu you can use the GUI to shutdown the computer without a password, but if you use the poweroff command you will need to type in a password?
Well there is an easy fix. The /etc/sudoers file governs the use of the sudo command.
It can also be configured to allow specified commands, users and/or groups to not have to worry about a sudo password.
In Ubuntu, this file also sources the /etc/sudoers.d/ directory so the sudoers file doesn't get too cluttered.
I created a new file called "powercmds" under this directory with the following contents:
Then updated its permissions with this command:
Now anyone in the admin group will not require a password to shutdown the machine.
This is very useful for scripting, such as if I want to download a large file and have the computer shutdown when its finished (so I can go to bed or something) this is now possible:
Well there is an easy fix. The /etc/sudoers file governs the use of the sudo command.
It can also be configured to allow specified commands, users and/or groups to not have to worry about a sudo password.
In Ubuntu, this file also sources the /etc/sudoers.d/ directory so the sudoers file doesn't get too cluttered.
I created a new file called "powercmds" under this directory with the following contents:
# Allow users in the admin group to poweroff the machine without a password
%admin ALL = NOPASSWD: /sbin/shutdown, /sbin/poweroff, /sbin/halt, /sbin/reboot
Then updated its permissions with this command:
sudo chmod 0440 /etc/sudoers.d/powercmds
Now anyone in the admin group will not require a password to shutdown the machine.
This is very useful for scripting, such as if I want to download a large file and have the computer shutdown when its finished (so I can go to bed or something) this is now possible:
wget http://somesite.com/somefile.big 2> ~/Desktop/dl.log; sudo poweroff
Mounting NFS in Ubuntu
At home we have a NAS that supports NFS!
Its quite easy to setup Ubuntu (11.04) as an NFS client - this will allow you to mount the NAS on your local filesystem and it will appear just like any other directory.
First step is to install the nfs-common package:
You can now mount NFS volumes!
To do so temporarily, can use this command:
The mount point needs to exist prior to mounting.
For example, my nas would be mounted as follows:
To make this permanent, you would need to add the following line to /etc/fstab:
As a bonus, this also allows you to use the mount and umount commands by just specifying the mount point as these commands will query the /etc/fstab file.
For example, once your /etc/fstab file is up to date, these commands will work without specifying the remote host and path:
Its quite easy to setup Ubuntu (11.04) as an NFS client - this will allow you to mount the NAS on your local filesystem and it will appear just like any other directory.
First step is to install the nfs-common package:
sudo apt-get install nfs-common
You can now mount NFS volumes!
To do so temporarily, can use this command:
sudo mount.nfs <IPADDRESS>:<REMOTEPATH> <MOUNTPOINT>
The mount point needs to exist prior to mounting.
For example, my nas would be mounted as follows:
sudo mkdir /mnt/nas
sudo mount.nfs 192.168.1.10:/nfs/Public /mnt/nas
To make this permanent, you would need to add the following line to /etc/fstab:
192.168.1.10:/nfs/Public /mnt/NAS nfs defaults 0 0
As a bonus, this also allows you to use the mount and umount commands by just specifying the mount point as these commands will query the /etc/fstab file.
For example, once your /etc/fstab file is up to date, these commands will work without specifying the remote host and path:
sudo umount /mnt/nassudo mount /mnt/nas
Regex substitution 101
A while ago I was helping a friend with a regex.
He wanted to extract parts of the /etc/passwd file, so I explained my basic thought process to him so he could understand how I came up with the pattern.
I thought I would (paraphrase and) blog this explanation, as it might just help others out too.
The Explanation:
First you have to write a regex that matches as much of the string (in this case the lines in the passwd file) as you need (or all of it to be safe):
You can repeat this pattern with the * operator to match everything up to the first colon (because that wont match the pattern):
That pattern obviously doesnt have the bit you want, so you need to keep matching...
The next character you need to match is the colon itself:
This isn't enough either, but now you just need to repeat your self for as many sections as you want.
There is 6 colons and 7 fields in your example of the passwd file, so repeat the pattern to suit:
Now this pattern will match the entire string by going through section-by-section.
Of course .* would also match the whole string, but now we have parts of the pattern that represent parts of the string.
Using these parts, we can wrap the bit you want to use with backreferences (brackets) so we can use them later.
Lets say you only wanted the 5th field (the username).
First, wrap the 5th field in a backreference.
Note you have to escape the brackets with a backslash otherwise it will look for an actual bracket character:
Now you can use it in a substitution, which will replace everything that is matched with what you tell it to:
This will replace what it has matched (which is everything) with the word 'hello'
Now you can add that part that you captured earlier with the backreference
The \1 means the first backreference, if you had 2 sets of backets, you could also use \2
Running this substition will result in this line:
becoming this line:
To extend this further, you could add stuff like this:
Which would result in this line:
Obviously you wouldnt want to make these substitutions in your passwd file, but you could use this regex substitution in a pipeline with sed, like this:
Note that unlike vim, sed requires the substitution to be terminated with a trailing separator, so valid syntaxes are:
The last separator is useful for putting additional options, such as g for global replaces (multiple times on one line), etc.
Another helpful note is that the separator does not have to be / it could be (almost) any character.
For example, / might be cumbersome if your dealing with paths that have a lot of /'s, so you could use # instead:
He wanted to extract parts of the /etc/passwd file, so I explained my basic thought process to him so he could understand how I came up with the pattern.
I thought I would (paraphrase and) blog this explanation, as it might just help others out too.
The Explanation:
First you have to write a regex that matches as much of the string (in this case the lines in the passwd file) as you need (or all of it to be safe):
[^:] = will match a character that is not a colon
You can repeat this pattern with the * operator to match everything up to the first colon (because that wont match the pattern):
[^:]* = will match everything up to the colon
That pattern obviously doesnt have the bit you want, so you need to keep matching...
The next character you need to match is the colon itself:
[^:]*: = will match everything up to the colon, and then one colon character too
This isn't enough either, but now you just need to repeat your self for as many sections as you want.
There is 6 colons and 7 fields in your example of the passwd file, so repeat the pattern to suit:
[^:]*:[^:]*:[^:]*:[^:]*:[^:]*:[^:]*:[^:]*
Now this pattern will match the entire string by going through section-by-section.
Of course .* would also match the whole string, but now we have parts of the pattern that represent parts of the string.
Using these parts, we can wrap the bit you want to use with backreferences (brackets) so we can use them later.
Lets say you only wanted the 5th field (the username).
First, wrap the 5th field in a backreference.
Note you have to escape the brackets with a backslash otherwise it will look for an actual bracket character:
[^:]*:[^:]*:[^:]*:[^:]*:\([^:]*\):[^:]*:[^:]*
Now you can use it in a substitution, which will replace everything that is matched with what you tell it to:
:%s/[^:]*:[^:]*:[^:]*:[^:]*:\([^:]*\):[^:]*:[^:]*/hello
This will replace what it has matched (which is everything) with the word 'hello'
Now you can add that part that you captured earlier with the backreference
:%s/[^:]*:[^:]*:[^:]*:[^:]*:\([^:]*\):[^:]*:[^:]*/hello \1
The \1 means the first backreference, if you had 2 sets of backets, you could also use \2
Running this substition will result in this line:
apache:x:48:48:Apache:/var/www:/sbin/nologin
becoming this line:
hello Apache
To extend this further, you could add stuff like this:
:%s/[^:]*:[^:]*:[^:]*:[^:]*:\([^:]*\):\([^:]*\):[^:]*/hello \1, I know you home is \2 because I know regex
Which would result in this line:
hello Apache, I know you home is /var/www because I know regex
Obviously you wouldnt want to make these substitutions in your passwd file, but you could use this regex substitution in a pipeline with sed, like this:
cat /etc/passwd | sed "s/[^:]*:[^:]*:[^:]*:[^:]*:\([^:]*\):\([^:]*\):[^:]*/hello \1, I know you home is \2 because I know regex/" > ~/regexed.txt
Note that unlike vim, sed requires the substitution to be terminated with a trailing separator, so valid syntaxes are:
sed = sed 's/PATTERN/REPLACEMENT/'vim = :s/PATTERN/REPLACEMENT/vim = :s/PATTERN/REPLACEMENT
The last separator is useful for putting additional options, such as g for global replaces (multiple times on one line), etc.
Another helpful note is that the separator does not have to be / it could be (almost) any character.
For example, / might be cumbersome if your dealing with paths that have a lot of /'s, so you could use # instead:
%s#this#that#g
Search and replace in multiple files with Sed
Back on the 30th of May, I put up a blog post on how to do a search and replace in multiple files with Vim.
I think this is a great way of doing substitutions in multiple files because you get to see a preview of what it looks like before you actually writing it to disk.
This is great for a small number of files, but to do a large directory of files, you don't really gain any advantages as you're probably not going to open every file in a vim buffer and review each one separately.
This is where sed and find come in handy!
This command will replace every occurrence of the word "foo" with the word "bar" in all html files recursively from the current directory:
The explanation:
This might look a little confusing, but it essentially 2 parts:
The first part will list all the .html files recursively and for each one, execute the command specified by the -exec option:
The second part is the command to execute for each found file, which in this case is sed:
The '{}' represents the current file and the \; represents the end of the command to execute as part of the -exec option.
Doing more:
As you can see, the -name option to the find command takes a glob pattern.
If you wanted to be more specific about which files should have the substituion, you could use a regular expression instead, like this:
This regex will match all files that end with ".html" or ".js".
If you wanted to preview your changes before they are actually written to disk, there are a few ways of accomplishing this, but the simpliest is probably to modify the command as follows:
Removing the "-i" will mean that instead of writing the changes "in place", the changed output will be written to STDOUT instead of the files.
Then to capture this (potentially large) output, we pipe it to less.
From within less you will be able to do searches (with the "/" key) and scroll through the output to do a quick sanity check.
Once your happy, you can remove the pipe and add the "-i" option again to make it permanent!
I think this is a great way of doing substitutions in multiple files because you get to see a preview of what it looks like before you actually writing it to disk.
This is great for a small number of files, but to do a large directory of files, you don't really gain any advantages as you're probably not going to open every file in a vim buffer and review each one separately.
This is where sed and find come in handy!
This command will replace every occurrence of the word "foo" with the word "bar" in all html files recursively from the current directory:
find . -name "*.html" -exec sed -i "s/foo/bar/g" '{}' \;The explanation:
This might look a little confusing, but it essentially 2 parts:
The first part will list all the .html files recursively and for each one, execute the command specified by the -exec option:
find . -name "*.html" -exec ...
The second part is the command to execute for each found file, which in this case is sed:
sed -i "s/foo/bar/g" <TheFile>
The '{}' represents the current file and the \; represents the end of the command to execute as part of the -exec option.
Doing more:
As you can see, the -name option to the find command takes a glob pattern.
If you wanted to be more specific about which files should have the substituion, you could use a regular expression instead, like this:
find . -regex ".*[.]html\|.*[.]js" -exec sed -i "s/foo/bar/g" '{}' \;This regex will match all files that end with ".html" or ".js".
If you wanted to preview your changes before they are actually written to disk, there are a few ways of accomplishing this, but the simpliest is probably to modify the command as follows:
find . -name "*.html" -exec sed "s/foo/bar/g" '{}' \; | lessRemoving the "-i" will mean that instead of writing the changes "in place", the changed output will be written to STDOUT instead of the files.
Then to capture this (potentially large) output, we pipe it to less.
From within less you will be able to do searches (with the "/" key) and scroll through the output to do a quick sanity check.
Once your happy, you can remove the pipe and add the "-i" option again to make it permanent!
ssh-copy-id with an alternative port
If you use ssh on a regular basis, you probably already know about setting up ssk-keys.
If you dont know about ssh-keys, you should! - its worth reading up on.
ssh-copy-id is a helper script that will copy your public key across to the remote machine and append it to the authorized_keys file.
This is all well and good if the server is on port 22, but for non-standard ports, this script does not support a -p option.
Instead of copying across the key manually, I googled for workarounds and came across this post where the author explains that the arguments to ssh-copy-id are simply passed on to the ssh command.
This means by using quotes, everything inside of them will be passed straight through and that allows a command like this to achieve the desired result:
Kudos to Mike Gerwitz for the tip.
If you dont know about ssh-keys, you should! - its worth reading up on.
ssh-copy-id is a helper script that will copy your public key across to the remote machine and append it to the authorized_keys file.
This is all well and good if the server is on port 22, but for non-standard ports, this script does not support a -p option.
Instead of copying across the key manually, I googled for workarounds and came across this post where the author explains that the arguments to ssh-copy-id are simply passed on to the ssh command.
This means by using quotes, everything inside of them will be passed straight through and that allows a command like this to achieve the desired result:
ssh-copy-id -i ~/.ssh/id_rsa.pub ‘-p xxxx username@host’
Kudos to Mike Gerwitz for the tip.
Pencil for UI design
I'm designing software!
I'm currently in the early stages of design and have developed some basic requirements, a feature list, some rough UI sketches and a very rough roadmap.
I'm putting a fair bit of thought into the user-friendliness of the app and I have gone through quite a few different idea's for the UI.
During this sort-of brainstorming activity, I got really sick of trying to change my sketches on paper and asked my self "why aren't I doing this electronically!?" - so I started looking into freeware mockup software.
My searches lead me to this page:
http://stackoverflow.com/questions/54606/what-free-software-can-i-use-to-create-ui-mockups
Which lead me to Pencil:
http://pencil.evolus.vn/en-US/Home.aspx
Pencil is an XUL based application for making UI mockups - and its free!
For those of you that have used professional UI mocking tools, I'm not sure you'll find this to suit your needs, but as I have never used any software like this, this was basic enough for me (and faster than using The GIMP).
Pencil is advertised as a firefox plugin, but the .xpi is configured for FF3.5 (which is a little old!) so instead of hacking at this, the downloads page offers a "stand-alone" option that you can run with xulrunner.
Please note at the time of this blog, this app requires xulrunner 1.9.
In Ubuntu, xulrunner can be easily installed with this command:
Once you've downloaded and extracted Pencil, and you have xulrunner 1.9 installed, you can run Pencil by giving xulrunner the application.ini file, for example:
The UI for Pencil is pretty intuitive and judging by the menus, there isn't a whole bunch of advanced features (or at least from what I can tell), but I do like the simplicity and I was able to sketch up my UI design quite quickly.
By deafult (on Ubuntu) it comes with a number of "Collections" of widgets to start playing with.
I particularly like the "Sketchy GUI" collection for mockups, so the end result does not allow the viewer to let any preconceived opinions about the look and feel affect their judgement (some people dont like the look of the Windows XP widgets and may get turned off straight away).
This also means if you change the implementation (from desktop app to web app for example) the mockups may possibly stay the same without too much confusion.
If you are after more complete mockup software, that StackOverflow article has some good references, and I have heard Balsamiq is quite good, but Pencil suited my needs just fine.
I'm currently in the early stages of design and have developed some basic requirements, a feature list, some rough UI sketches and a very rough roadmap.
I'm putting a fair bit of thought into the user-friendliness of the app and I have gone through quite a few different idea's for the UI.
During this sort-of brainstorming activity, I got really sick of trying to change my sketches on paper and asked my self "why aren't I doing this electronically!?" - so I started looking into freeware mockup software.
My searches lead me to this page:
http://stackoverflow.com/questions/54606/what-free-software-can-i-use-to-create-ui-mockups
Which lead me to Pencil:
http://pencil.evolus.vn/en-US/Home.aspx
Pencil is an XUL based application for making UI mockups - and its free!
For those of you that have used professional UI mocking tools, I'm not sure you'll find this to suit your needs, but as I have never used any software like this, this was basic enough for me (and faster than using The GIMP).
Pencil is advertised as a firefox plugin, but the .xpi is configured for FF3.5 (which is a little old!) so instead of hacking at this, the downloads page offers a "stand-alone" option that you can run with xulrunner.
Please note at the time of this blog, this app requires xulrunner 1.9.
In Ubuntu, xulrunner can be easily installed with this command:
sudo apt-get install xulrunner-1.9.2
Once you've downloaded and extracted Pencil, and you have xulrunner 1.9 installed, you can run Pencil by giving xulrunner the application.ini file, for example:
xulrunner /opt/Pencil-1.2-0-linux-gtk/application.ini
The UI for Pencil is pretty intuitive and judging by the menus, there isn't a whole bunch of advanced features (or at least from what I can tell), but I do like the simplicity and I was able to sketch up my UI design quite quickly.
By deafult (on Ubuntu) it comes with a number of "Collections" of widgets to start playing with.
I particularly like the "Sketchy GUI" collection for mockups, so the end result does not allow the viewer to let any preconceived opinions about the look and feel affect their judgement (some people dont like the look of the Windows XP widgets and may get turned off straight away).
This also means if you change the implementation (from desktop app to web app for example) the mockups may possibly stay the same without too much confusion.
| Screenshot of the "Sketchy GUI" collection from the Pencil Website |
If you are after more complete mockup software, that StackOverflow article has some good references, and I have heard Balsamiq is quite good, but Pencil suited my needs just fine.
Python-fu for The Gimp
I've been meaning to learn how to script The Gimp for a while now, but have never bothered to put the time aside to do it. Well, I finally did it, and this is why and how :)
The story:
When I had my 21st birthday, my brother made the party invites for me. He added a whole bunch of photos and I've still got a copy of that with all my photos as a keepsake.
Now his birthday is coming up and I thought I would repay the favour.
The Idea I had was to scan a bunch of old photos (like he did), then use The Gimp to make them look like printed photos (white border, drop shadow, kind of like polaroids) and scatter them around a "Happy Birthday" title.
I spent quite a while scanning the photos, adding them all as layers to a single canvas, resizing them to suit and then individually adding white padding, a black stroke around the outside, dropping a shadow, rotating and moving each individual layer to lay it out nicely, I was finally happy with the end result and saved a .xcf and then exported a .jpg.
At this stage I had all the scans, a font, a background image, the .xcf and the .jpg all saved in a folder on my desktop.
I quit The Gimp, got a flash drive and copied the .jpg over so I got get it printed, shutdown the pc and went for dinner.
When I got back quite some time later, my pc hadn't quite shutdown yet, it just had a black screen.. So I left it a little longer and it still hadn't shutdown, so I held down the power button to force it.
The next day, I got asked to make a small adjustment to the invite, and to my horror, I could not find the .xcf anywhere! I had the exported .jpg from the flash drive, but that wasn't suitable to make the adjustment... something had happened and to this day I'm still not sure what, but I lost all my work... When I realised I had to redo all that work, that's when I put time aside to learn how to script The Gimp!
Scripting The Gimp:
I took a look at some code examples for The Gimp's script-fu functionality and having never learned Lisp, it looked pretty foreign to me! That's when I noticed there was a Python-fu equivalent (luckily).
Using the Python Console from within Gimp is really easy!
It has a "Browse" button which brings up the "Python Procedure Browser" - which is a list of functions that interact with The Gimp.

Using the filterbox at the top, you can easily find the python function that matches the action you would normally execute using The Gimp's menus (such as a layer resize, or filter).
When you select the function, it will show you a basic man page on what it does and the parameters it takes, and applying this function will insert the code into the console with place holders for the parameters, which you can then simply modify and execute.
After getting the basics from Googling around, I made a basic script that I just copied and pasted into the console when I wanted to execute the repetitive actions.
I then optimised the script by wrapping it in a function, doing all my actions in a separate context (as not to disturb the users context for things like selected brush, etc.) and also group all my actions in a single undo (to simplify the history and make it easy to undo what my script does).
Work-arounds:
There are a couple of hacks in the script that I couldn't work out the nice way around in a short period of time (I'm still a n00b).
Rather than working out how to fix it, I thought I would just describe them here.
One of those being that to add a white border around a layer, I need to resize the layer with an offset, and this new extra space would not always be white (regardless of my selected background color). My work around was to add a white layer behind it and merge it down.
The other hack was with stoking. To add a 1px black stroke around a layer, I normally just specify 1px black from the stroke dialogue (as opposed to using the selected brush). I could not find an equivalent to this in the Python API - it always used the selected brush.
As the default brushes include a 1px brush (and a 3px brush, but no 2px brush) I thought I'd use that, but to do a stroke around the outside of a layer, I needed to select-all, then stoke, but with a 1px brush, I could not specify I wanted that 1px to be on the inside of the selection. So stroking with this method put the line on the top and left sides, not on the bottom and right.
The hack I used here is to rotate 180 degrees, stroke and repeat.
Not the most elegant of scripts, but this was my first attempt and got the job done.
Registering the script with The Gimp:
So now that the script was working (albeit with work arounds) and I added the polish (function definition, separate context, grouped undo, etc.) I was ready to add it to the menus just like any other filter.
I used an existing script (located in ~/.gimp-2.6/plug-ins/) as a baseline and adjusted it for my new script (that I called "photofy").
This part of the code allows you to specify the name of the script, where in the menu it should be registered and if there are any user-specified inputs to the script you can even specify a simple GUI for a dialogue box to get them from the user - which I did to collect the desired size of the white margin.
You can see this part of the code at the bottom of the python script.
Demo:
So now the fun part, this is how you use it :)
Here is a simple image with 2 layers: a white background layer and a smaller subject layer (the gradient).

With the subject layer selected, navigate to the menu in which the "Photofy" script is registered.

The dialogue box that I specified in the script-fu code segment at the bottom of the script will appear and allow the user to enter the size of the white margin.

When you press "OK", the script will run through its actions and the user's environment will remain the same, and the there will be a single new undo step in the history.
This is the final product:

The code:
If you're interested in seeing what the code looks like, or want to use the script yourself (either as is, or as a baseline to write you own), it is available here:
https://github.com/stevenocchipinti/Gimp-Python-Fu/blob/master/photofy.py
Vi mode for Bash
So it turns out bash has a vi mode!
(Can't believe I didn't know about this earlier)
To enable vi mode, just type this into your shell:
That will enable it for this shell so you can try it out, and if you like it, add that line to your ~/.bashrc file for future.
One really useful vi-mode command is pressing 'v' from command mode. This will put your current command line into vim to modify.
To get more help on the commands available in vi-mode, take a look at the bottom of this man page:
To get more information on the various options available for bash, take a look at:
I'm going to give it ago in the coming weeks to see if its actually useful or not.
So far, I've found one small annoyance, I use ctrl+l to clear the terminal, but with the vi key bindings enabled, this only works from command mode (you have to hit ESC first).
To fix this, I added this to my ~/.bashrc file:
These commands could also be added to /etc/inputrc, but I'm happy to leave these 2 lines together in my ~/.bashrc so its easier to remember.
(Can't believe I didn't know about this earlier)
To enable vi mode, just type this into your shell:
$> set -o vi
That will enable it for this shell so you can try it out, and if you like it, add that line to your ~/.bashrc file for future.
One really useful vi-mode command is pressing 'v' from command mode. This will put your current command line into vim to modify.
To get more help on the commands available in vi-mode, take a look at the bottom of this man page:
$> man 3 readline
To get more information on the various options available for bash, take a look at:
$> help set
I'm going to give it ago in the coming weeks to see if its actually useful or not.
So far, I've found one small annoyance, I use ctrl+l to clear the terminal, but with the vi key bindings enabled, this only works from command mode (you have to hit ESC first).
To fix this, I added this to my ~/.bashrc file:
bind -m vi-insert 'Control-l: clear-screen'
These commands could also be added to /etc/inputrc, but I'm happy to leave these 2 lines together in my ~/.bashrc so its easier to remember.
PhpRemoteAdmin
If you've ever used PhpMyAdmin before, you'll know it can be quite handy, especially for people like me who always forget SQL's syntax.
I even use it for simple tasks just so I can see what SQL it generated and it even has a handy "Create PHP Code" button to give me a baseline to start hacking the query to suit my situation.
This is great for local setups, but sometimes I need to do a query a production database where PhpMyAdmin is not installed and its alot easier to inspect the data of big tables with a gui (at least for me anyway).
Another helpful tip that I picked up from my new work place (thanks Rich) is to make PhpMyAdmin connect to a remote database via an SSH tunnel.
It requires a small config change to PhpMyAdmin, but it works a charm!
To differentiate between a tunnelled database and the local one, you need to configure your web server to serve up PhpMyAdmin from an additional URL, such as http://localhost/phpremoteadmin in addition to the standard http://localhost/phpmyadmin.
I added a second alias for PhpMyAdmin in /etc/apache2/conf.d/phpmyadmin.conf to look like this:
Then, I modified my /etc/phpmyadmin/config.inc.php to include this:
Basically that means if the request is for /phpremoteadmin, look for the database on port 6666 instead of the preconfigured database port.
You'l have to reload apache for these changes to take effect:
Then you need a SSH tunnel from your local port 6666 to the servers port 3306 (where mysql is normally listening). To create this tunnel, you can use:
But, to make it easier, I use (a slight variation) of this script:
The script also allows you to pass in an optional argument of the host where the database is.
By default, that is localhost (the remote server's localhost).
This is useful if you can only ssh to a gateway server and the database is on another server within that remote network that you wouldn't normally be able to ssh directly to.
This has been really helpful, so I wanted to share :)
I even use it for simple tasks just so I can see what SQL it generated and it even has a handy "Create PHP Code" button to give me a baseline to start hacking the query to suit my situation.
This is great for local setups, but sometimes I need to do a query a production database where PhpMyAdmin is not installed and its alot easier to inspect the data of big tables with a gui (at least for me anyway).
Another helpful tip that I picked up from my new work place (thanks Rich) is to make PhpMyAdmin connect to a remote database via an SSH tunnel.
It requires a small config change to PhpMyAdmin, but it works a charm!
To differentiate between a tunnelled database and the local one, you need to configure your web server to serve up PhpMyAdmin from an additional URL, such as http://localhost/phpremoteadmin in addition to the standard http://localhost/phpmyadmin.
I added a second alias for PhpMyAdmin in /etc/apache2/conf.d/phpmyadmin.conf to look like this:
Alias /phpmyadmin /usr/share/phpmyadmin
Alias /phpremoteadmin /usr/share/phpmyadmin
Then, I modified my /etc/phpmyadmin/config.inc.php to include this:
// If phpremoteadmin is requested, use an ssh tunnel on 6666
// Note: This doesn't create the tunnel, use ~/bin/mysql_remote
if (substr_count($_SERVER["REQUEST_URI"], "phpremoteadmin") > 0) {
$cfg['Servers'][$i]['connect_type'] = 'tcp';
$cfg['Servers'][$i]['port'] = '6666';
$cfg['Servers'][$i]['host'] = '127.0.0.1';
}
Basically that means if the request is for /phpremoteadmin, look for the database on port 6666 instead of the preconfigured database port.
You'l have to reload apache for these changes to take effect:
sudo /etc/init.d/apache2 reload
Then you need a SSH tunnel from your local port 6666 to the servers port 3306 (where mysql is normally listening). To create this tunnel, you can use:
ssh -L 6666:localhost:3306 $USER@$HOST
But, to make it easier, I use (a slight variation) of this script:
#!/bin/sh
if [ $# -lt 1 ] || [ $# -gt 2 ]; then
echo "Usage: $0 host1 [host2]"
exit 2
fi
USER="steve"
HOST=$1
DBHOST="localhost"
[ -z "$2" ] || DBHOST="$2"
echo "Browse to: http://localhost/phpremoteadmin"
ssh -L 6666:$DBHOST:3306 $USER@$HOST
The script also allows you to pass in an optional argument of the host where the database is.
By default, that is localhost (the remote server's localhost).
This is useful if you can only ssh to a gateway server and the database is on another server within that remote network that you wouldn't normally be able to ssh directly to.
This has been really helpful, so I wanted to share :)
Bash auto-complete
There are a ton of extended auto-completions that come with Ubuntu, but they are disabled by default.
Have a look in the /etc/bash_completion.d/ directory for the programs that have specific auto-completes (such as apt-get, git, apache2ctl, etc.).
To get all the extra auto-completion-goodness, all you have to do is source /etc/bash_completion in your profile.
I added this is my .bashrc, but there may already be a commented out block for this in the stock .bashrc file for ubuntu:
# Enable bash completion in interactive shells
if [ -f /etc/bash_completion ] && ! shopt -oq posix; then
. /etc/bash_completion
fi
Can't open file for writing
E212: Can't open file for writingIf you use vim, you have probably come across this error before.
Press ENTER or type command to continue
It normally happens when you don't have permission to write to your chosen destination.
The temporary solution has traditionally been to save your changes to somewhere where you do have permissions (such as /tmp or ~), then use sudo to cp it across, or re-open the file in vim with sudo.
A collegue at work showed me a great trick to get around this when it happens (Thanks Rich). All you have to do is add this to your .vimrc file:
Then when you come across this error again, instead of of using :w you can use :W and it will prompt you for your sudo password before saving.command! W w !sudo tee % > /dev/null
Works brilliantly!
Flashy Prezis @ DDD
DDD Melbourne was on at Swinburne Uni on last weekend and a couple of friends and I went along.
This event was more targeted at Microsoft technologies, but there was a bit of other stuff to keep me interested.
I got to see some pretty neat JavaScript stuff, learned a thing or two about the vast range of Microsoft technologies, got to re-visit Android 101 and eat plenty of junk food!
I love that us nerds love pizza and cake! :)
Now as good as the day was, the topic I picked to blog about actually has nothing to do with the content of any of the talks.
This is partially because a fair amount of the MS tech stuff went over my head, but more to do with the website that I'm about to talk about is something I might consider for my own use in the future.
One of the speakers had a really neat presentation that kept the audiences attention with fancy transitions and clever choice of images and at the end of the presentation, we found out that it was all done through a site called prezi.com
Anyway, instead of me ranting on about it, it really has to be seen.
Here is a quick "Prezi" I knocked up, but this doesn't compare to the impressive prezi I saw at DDD:
http://prezi.com/8p2z_a_ua4mh/my-first-prezi/
Browsing through the community prezi's would probably give you a better Idea :)
Search and replace in multiple files with Vim
There are plenty of ways of doing a search and replace in multiple files in linux, but this is how I do it with vim.
The :all will split the window to show you all the files at once.
This would not be the best option for lots of files, but for a small number you get to see the changes that are made.
The :windo will execute the given command for all the files in the current window.
Note this wont affect windows in other tabs.
If you want to undo that change in all buffers, you can use the same method:
$> vim firstfile secondfile theothers*
:all
:windo %s/this/that/g
The :all will split the window to show you all the files at once.
This would not be the best option for lots of files, but for a small number you get to see the changes that are made.
The :windo will execute the given command for all the files in the current window.
Note this wont affect windows in other tabs.
If you want to undo that change in all buffers, you can use the same method:
:windo undoWhen your finished, you can save and quit with:
:wqallThere are plenty of variations, for more infomation checkout the help pages for these:
:tabdo:bufdo:argdo
Cleaning up indicator-applet in Ubuntu
By default, the indicator applet in the Unity panel has an item in the list for evolution and another for empathy - two programs I don't use!
But, its quite easy to get rid of them! All you have to do is remove the appropriate file in /usr/share/indicators/messages/applications
Instead of removing them, I just removed all read permissions (root can still do anything with it of course)
But, its quite easy to get rid of them! All you have to do is remove the appropriate file in /usr/share/indicators/messages/applications
Instead of removing them, I just removed all read permissions (root can still do anything with it of course)
$ cd /usr/share/indicators/messages/applications
$ sudo chmod 000 empathy evolution
Multi monitor keyboard shortcuts in Ubuntu
I'm now using Ubuntu 11.04 with Unity as my primary OS for my desktop at work.
I'm still coming to grips with Unity - somethings I like, others I don't.
One of the things I do like is the compiz plugin called "Grid".
At first I thought it was just a clone of Windows 7 where you can drag a window to the left and it will fill the left half of the screen, drag it to the top and it will maximize, but after taking a look at the key bindings it does a bit more!
Using alt + ctrl + the number pad, you get more options!
Alt+ctrl+4 will make the window fill the left half (like dragging), 6 will do right, 8 will do the top half, 2 will do the bottom half and 7, 9, 1 and 3 will put the window in the appropriate corner, 5 will put it in the middle and 0 will maximize it.
On top of this, if you press the key repeatedly it will adjust from 1/2 screen, to a 1/3, to 1/4, to 3/4 and to 2/3. This is surprisingly easy to use and really helpful!
The only thing I couldn't work out how to do was move a window from one monitor to the other as these actions occur per monitor (i.e. 1/2 of one screen).
The answer was quite easy though, I just needed to enable one more plugin: "Put".
The "Put" plugin looks like it does similar actions to "Grid", so before I enabled it, I disabled all the key bindings (there was only about 2 enabled anyway).
Then I set the keyboard binding for "Put To Next Output" to "<Control><Alt>KPEnter".
When I enabled it, the Unity panel got a little screwed up (which is evidently not hard to break), so I restarted X and everything worked how I expected it to.
Now atl+ctrl+keypad-enter will move the window between my left monitor and my right monitor!
The Tank Project!
So my brother Rob and I have wanted to work on a project together for a while now, and after our awesome Minecraft Server, we came to the realization that I love doing the functional side of things (setting up the software, etc.) and Rob loves doing the creative, hands-on side of things (putting the hardware together and making it look pro) and so together, this things compliment each other!
After scoring a Netduino (like an Arduino, but I write in C#.net instead of C) for use in a future project, this was the perfect opportunity for our skills to come together as Rob isn't keen on programming, and I'm probably not as good as him at making things, whereas he is quite passionate about that!
I've always wanted to have a play with an Arduino (or Netduino in this case). To actually allow my interest in programming to bridge across to the hardware world always seemed like a mystical unknown to me, but these little programmable micro-controllers allow just that - my software to use hardware!
Enter The Tank Project!
The idea was to build a physical tank that we can use the Netduino to control, but not just limited to controlling the movement of the tank, but then a variety of other features.
Things that came to mind were a working (not-so-dangerous, legal) canon, webcam feeds for remote control, mobile application to drive it, 360 degree spinning turret and just about anything else we could think of!
Our imagination started going wild with vague memories back to Robot Wars and so we set aside a day to brainstorm ideas and develop a plan of attack (pardon the pun). That day was yesterday, and it went well! :)
We're going to try to keep a project blog going if you want to keep track of the progress:
http://tank.stevenocchipinti.com
("keep track of the progress" is also a pun... theres going to be a few of these, lol!)
DHCP fixedhosts to /etc/hosts file
This was a completely random (and not that useful) thought!
I have memorized which IPs are assigned to which machines in our home LAN as simply pinging a hostname doesnt really work in linux (by default) as it did with windows (unless I setup WINS... I think... correct me if I'm wrong).
So short of setting up an in-house DNS server, hosts files come in handy for stuff like this.
(I really didn't need to setup a hosts file, but assuming I did want the convenience)
I thought I've already defined which hosts get which IPs in the fixed hosts table of the DHCP server in my router, surely I could just use that!
I remembered the router has telnet open internally, so I wrote a one-liner to do it:
Then I use sed to put it into the same format as /etc/hosts:
... I don't think I'll actually use it, lol, but it was fun anyway :P
I have memorized which IPs are assigned to which machines in our home LAN as simply pinging a hostname doesnt really work in linux (by default) as it did with windows (unless I setup WINS... I think... correct me if I'm wrong).
So short of setting up an in-house DNS server, hosts files come in handy for stuff like this.
(I really didn't need to setup a hosts file, but assuming I did want the convenience)
I thought I've already defined which hosts get which IPs in the fixed hosts table of the DHCP server in my router, surely I could just use that!
I remembered the router has telnet open internally, so I wrote a one-liner to do it:
echo "admin^M$PASSWORD^Mdhcpserver list fixedhosts^M^]^D" | nc 192.168.1.1 23 | \grep "[ ]*[0-9]" | sed "s/[ 0-9]*| \([^ ]*\)[ ]*| \([^ ]*\).*/\2\t\1/g"I echo the username, password, the command to give me the table and logout then grep for the (numbered) entries of the printed table, which gives me entries that look like this:
...
4 | stevepc | 192.168.1.3 | 00:11:22:33:44:55 | 0 |
5 | NAS | 192.168.1.10 | 00:22:33:44:55:66 | 0 |
9 | Minecraft_SVR | 192.168.1.62 | 00:33:44:55:66:77 | 0 |
...
Then I use sed to put it into the same format as /etc/hosts:
...This isn't really that useful, but it took a couple of minutes, just to "see if I could do it"... and it worked :)
192.168.1.3 stevepc
192.168.1.10 NAS
192.168.1.62 Minecraft_SVR
...
... I don't think I'll actually use it, lol, but it was fun anyway :P
Multiple Google accounts at once!
So I started my new job and they use Google Apps!
Initially I thought this was fantastic, until I realized that because I also use Google Apps for my personal email, I couldn't have 2 simultaneous gmail logins (by default).
I found some out-of-date firefox plugins to work around this, but they weren't very nice, so I just pinned my work gmail as an app tab and left it at that.
Then I noticed a co-worker had about 3 gmail app tabs, and too my surprise it wasnt some dodgy plugin that allowed this, but an official Google solution!
The answer:
http://www.google.com/support/accounts/bin/answer.py?answer=181599
This allows you to have multiple Google accounts signed in at once, with a few caveats.
Once enabled, the first account you sign into is your "primary" and behaves normal, the subsequent logins will only work on particular products (gmail is the obvious one) but will work in isolation to your other logins.
I chose my personal account as my primary because things like blogger do not work as a secondary account.. and I don't have a work-blogger account :P
Thisis was only really an issue if you want to use a single browser on a computer, as my phones gmail app handles multiple logins fine.
Initially I thought this was fantastic, until I realized that because I also use Google Apps for my personal email, I couldn't have 2 simultaneous gmail logins (by default).
I found some out-of-date firefox plugins to work around this, but they weren't very nice, so I just pinned my work gmail as an app tab and left it at that.
Then I noticed a co-worker had about 3 gmail app tabs, and too my surprise it wasnt some dodgy plugin that allowed this, but an official Google solution!
The answer:
http://www.google.com/support/accounts/bin/answer.py?answer=181599
This allows you to have multiple Google accounts signed in at once, with a few caveats.
Once enabled, the first account you sign into is your "primary" and behaves normal, the subsequent logins will only work on particular products (gmail is the obvious one) but will work in isolation to your other logins.
I chose my personal account as my primary because things like blogger do not work as a secondary account.. and I don't have a work-blogger account :P
This
24-70mm f2.8 VS 17-50mm f2.8
A friend of mine has a Canon 24-70mm f2.8 'L' lens and after having a play with it and looking at his photos I have had a little bit of gear-envy.
The extra speed and frequent bokeh was really nice!
Naturally I started looking at prices.. and the Nikon equivalent is... not cheap!
I cant justify $1969 on a lens! Especially considering that I dont actually need it, and I am just a hobbyist (therefore: return on investment == profit from my work == $0).
I then read up on some more affordable Sigma and Tamron lenses that were similar and liked the prices much better!
... but im still really indecisive :(
Then I saw the 17-50mm f2.8 lenses (from Tamron, Sigma and Tokina), and this made me think..
When I was travelling to Japan (with Sarma, the Canon guy) I remember him complaining about not being able to get a wide enough shot and he would often stand pretty far back to get the shot he wanted or swap to his 10-20mm lens.
This probably wouldn't be an issue with a full-frame camera, but the 50d's smaller sensor means it is already quite "zoomed-in" at its widest setting.
I started writing up an email to ask Sarma what he thought and realized I have all his photos from our Japan trip, so with a bit of linux command line fun, I came up with this:
The output looked like this:
The extra speed and frequent bokeh was really nice!
Naturally I started looking at prices.. and the Nikon equivalent is... not cheap!
I cant justify $1969 on a lens! Especially considering that I dont actually need it, and I am just a hobbyist (therefore: return on investment == profit from my work == $0).
I then read up on some more affordable Sigma and Tamron lenses that were similar and liked the prices much better!
... but im still really indecisive :(
Then I saw the 17-50mm f2.8 lenses (from Tamron, Sigma and Tokina), and this made me think..
When I was travelling to Japan (with Sarma, the Canon guy) I remember him complaining about not being able to get a wide enough shot and he would often stand pretty far back to get the shot he wanted or swap to his 10-20mm lens.
This probably wouldn't be an issue with a full-frame camera, but the 50d's smaller sensor means it is already quite "zoomed-in" at its widest setting.
I started writing up an email to ask Sarma what he thought and realized I have all his photos from our Japan trip, so with a bit of linux command line fun, I came up with this:
exiftool -p '$focallength' -q -f `find -L .` | sort -n | uniq -cNow for the explanation:
- exiftool -p '$focallength' -q -f
- exiftool extracts exif information from jpg's.The -p prints a formatted string, which I inserted just the $focallength variable.The -q means quiet (basically, dont print too much).The -f is the list of files, which I use a sub-command (wrapped in backticks) to get.
- find -L .
- As all of our groups photos were kind-of mixed in together, I created a directory with symlinks to just Sarma's photos (hence the find -L, where -L will follow symlinks to the appropriate directories).
- sort -n
- This just sorts the data by numberic value (so 10 > 1), this is mainly so the uniq command works properly.
- uniq -c
- This will collapse the data down to unique values and with the -c, it will also print the number of occurences have been collapsed down.
The output looked like this:
86    10.0 mm
2     11.0 mm
2     15.0 mm
14    16.0 mm
2     18.0 mm
108   20.0 mm
2362  24.0 mm
142   28.0 mm
176   32.0 mm
138   35.0 mm
104   40.0 mm
118   45.0 mm
136   47.0 mm
120   50.0 mm
94    55.0 mm
78    58.0 mm
76    60.0 mm
76    65.0 mm
70    67.0 mm
52    70.0 mm
52    73.0 mm
34    75.0 mm
14    80.0 mm
48    82.0 mm
56    84.0 mm
18    85.0 mm
24    88.0 mm
10    90.0 mm
14    92.0 mm
12    93.0 mm
16    95.0 mm
10    96.0 mm
4     97.0 mm
8     98.0 mm
8     99.0 mm
12    100.0 mm
10    102.0 mm
404   105.0 mm
With the majority of Sarma's photos clearly being taken at 24mm, it made me think that as I too have a cropped sensor camera, the wider 17-50mm lenses are probably a better choice for me as I really dont have any plans to lash out on a full frame camera anytime soon :P
(Minecraft and) Arch Linux FTW!
I haven't really played a game properly since back in my Counter Strike days, but recently my brother and I started playing Minecraft... and its incredibly addictive!
Minecraft give you the option of running a Java based dedicated server and so as we were starting out, my brother would start up a dedicated server and we would both connect to it.
As time went on, we thought it would be really cool to have a dedicated Minecraft box and thought we could build one out of some old hardware, which brings me to the HTPC!
A little while ago, my brother built this (the black box):

He did an awesome job!
Basically gutted our very first dvd player (which was great for its time) and got some cheap (physically small) hardware off eBay and managed to fit it all inside!
It involved making alot of little brackets, extender cables, etc. but with a lot of effort it turned out pretty impressive!
Unfortunately, using it as a media pc was a bit tough as it wasn't the most powerful of machines around and the graphics drivers weren't working too well so this got left in the dust for a while... until Minecraft came along!
Last weekend we decided to make this our dedicated server :)
A while ago a friend of a friend was talking about how good Arch Linux was for its simplicity and ease of administration, so I started reading up on it and I am impressed!
On the Arch Linux wiki they have a couple of guides to help you get going, but my favorite page was the explanation of the boot process.
After a bit of reading I worked out my plan of attack:
After the server was all setup, I wrote a little client side wrapper that will:
So now when I want to play Minecraft, I launch my script and it will power on the server and launch the client, I log in, wait about 5 seconds until my fancy fade-in notification appears, then join the server, play, and when im done, I issue the '/stop' command in Minecraft and it will stop the server and power it self off!
This was a great first experiment with Arch Linux and I didn't even know what getty was before this day.
Needless to say I was pretty happy with this setup and all in a days work :)
Minecraft give you the option of running a Java based dedicated server and so as we were starting out, my brother would start up a dedicated server and we would both connect to it.
As time went on, we thought it would be really cool to have a dedicated Minecraft box and thought we could build one out of some old hardware, which brings me to the HTPC!
A little while ago, my brother built this (the black box):

He did an awesome job!
Basically gutted our very first dvd player (which was great for its time) and got some cheap (physically small) hardware off eBay and managed to fit it all inside!
It involved making alot of little brackets, extender cables, etc. but with a lot of effort it turned out pretty impressive!
Unfortunately, using it as a media pc was a bit tough as it wasn't the most powerful of machines around and the graphics drivers weren't working too well so this got left in the dust for a while... until Minecraft came along!
Last weekend we decided to make this our dedicated server :)
A while ago a friend of a friend was talking about how good Arch Linux was for its simplicity and ease of administration, so I started reading up on it and I am impressed!
On the Arch Linux wiki they have a couple of guides to help you get going, but my favorite page was the explanation of the boot process.
After a bit of reading I worked out my plan of attack:
- Burn ISO to cd
- Install Arch Linux
- Install sudo (via pacman)
- Setup 'minecraft' user with sudo access to the poweroff command
- Install Java (via pacman)
- Install rungetty (via AUR)
- Replace 'agetty' with 'rungetty' and make the minecraft server startup on tty1, followed by a 'poweroff'
- Configure Wake-On-Lan
After the server was all setup, I wrote a little client side wrapper that will:
- Launch minecraft
- Broadcast a magic-packet to power on the server
- Start pinging it and when it is available, notify me via Ubuntu's 'notify-send' command
So now when I want to play Minecraft, I launch my script and it will power on the server and launch the client, I log in, wait about 5 seconds until my fancy fade-in notification appears, then join the server, play, and when im done, I issue the '/stop' command in Minecraft and it will stop the server and power it self off!
This was a great first experiment with Arch Linux and I didn't even know what getty was before this day.
Needless to say I was pretty happy with this setup and all in a days work :)