• Home
  • Blogger
  • Github
  • Travel
  • The Tank Project
skip to main | skip to sidebar

Steven Occhipinti

A braindump.

Disabling the Unity global menu

The Unity global menubar in Ubuntu can take a bit of getting used to, especially if you don't come from a Mac background, but once you do, the screen real estate saving is quite nice, especially on small screens like my eeepc.

But sometimes it can be frustrating!
For example, if you use The Gimp, alot of its functionality is in the menu, but for that to show, you must have the main window (the one with your work in it) focused, but whenever you select a tool from the toolbox, that window loses focus, and therefore you can't get to the menu.

I know all it takes is a click in the main window and then a click on the global menu, but this can get quite annoying.

Thankfully, there is an off-switch in the form of an env-var which you can either add to your profile to completely disable it, or just prefix it before you run commands like gimp.

All you need to do to disable it is set this:
UBUNTU_MENUPROXY=0

I made an alias so its easier to remember:
alias dam='UBUNTU_MENUPROXY=0 '

Note that typing (or shouting) dam gimp is not only to relieve the frustration of the global menubar, but it also stands for "Disable AppMenu" :)

There is a full write up with more details over at webupd8.org
Posted by Steve at 22:56 0 comments
Labels: linux , ubuntu , ui , unity Email This BlogThis! Share to X Share to Facebook

Recursive search with vimgrep

Usually when I need to find things in multiple files, I would use grep or ack from a terminal and then open those files in vim to do whatever it is that I have to do.

This is ok, but sometimes this can be a little annoying.
Vim has a :grep function which will use the system grep command, but it also has a :vimgrep function that is built in to vim.

I had left a bunch of TODO's through out my code as a reminder to come back to them, so using :vimgrep I was able to quickly jump between them:

:vimgrep TODO **/*

This tells vim to search for the pattern "TODO" recursively from the current directory.
The "**/" means recursive and the "*" means any file - therefore "**/*.rb" would just search the ruby scripts.

The results are loaded into the "quickfix window". This means if you want to see all the occurences, you can open the list with :copen
Naturally, :cnext, :cprevious, :cfirst, :clast, etc. will allow you to jump between them or you can use the quicklist window and press enter on the filename, or in gvim you can even use the mouse.

In addition, I use Tim Pope's Unimpaired vim plugin,which provides the easy shortcuts '[q' and ']q' for :cprevious and :cnext (respectively)
Posted by Steve at 13:46 0 comments
Labels: regex , vim Email This BlogThis! Share to X Share to Facebook

Ruby + parallel port + LEDs

In the initial R&D stages for our Tank Project we have to work out the most suitable way to interface from software to hardware - which I have never done before!


The parallel port

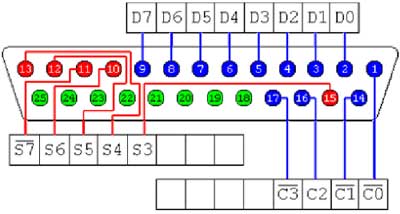
One of those options is to use the parallel port, which allows us 8 data pins that we can use for controlling motors, etc.
The layout of a parallel port is quite easy, there are 8 "D" pins for data with 8 matching "Ground" pins (shown in green below).

The test rig

As the output from the parallel port is about 5 volts, I though LED's were a suitable was of testing this out, so I went searching through our garage to find a parallel cable from an old printer and a bunch of LED's.
I found a bunch of tristate LED's - tristates have 3 legs instead of 2 and provide 2 different colors depending on which legs have power to them.
For example, if the circuit connects the left leg and the middle leg, it produces green light, whereas the right leg and middle leg produce red light.
Soldering 4 of these LEDs to a board meant I could join all the middle legs together which would be what I connect the ground wire from the parallel port to and the other 8 legs to the 8 data wires.


The software

In order to control when each of the data pins has power to it or not, you simply have to write 8 bits (a byte) to the parallel port where each bit corresponds to a data pin.
In linux this is quite simple as you can write to /dev/port just like any other file.
To test this out, I wrote a little Ruby script to play a fancy little sequence a few times. The code is quite simple considering some other examples on the net:


The fun part!

So my computer doesn't have a parallel port, but we have some older machines that do. So I found an old pc and booted off a linux live distro that has ruby, plugged in the cable with the LEDs on it, and ran my script, and this is what happens:
The conclusion

This is the first time I have ever written a program that uses hardware, albeit really basic hardware, but this has a lot of potential.
Instead of turning on lights, this small current could trigger relays to do more exciting things, or in our case power transistors using PWM to control motor speed for our tank - and its so simple!
Posted by Steve at 14:49 2 comments
Labels: hardware , linux , parallel port , programming , ruby , tank Email This BlogThis! Share to X Share to Facebook

Git stash, diff and patch

I recently found myself in a situation where I need to comment out certain lines in my code in order to test a particular set of features.

These commented out lines are only for my local development environment but will be useful in the future if this set of features needs work again.
In this situation, checking them into Git or making a personal .gitignore file are not suitable solutions.

I have found 2 good ways of accomplishing this:


Git stash:

Starting from a clean checkout, I put my temporary changes in place, then run this command:
git stash save temp workaround for some issue

Then I continue on with my work. I selectively leave these changes out of all my commits using git add -i then once everything is checked in except my temporary changes, I revert these temporary changes with git checkout -- . so I'm left with a clean repository.

When I need to work on a related feature again, I can list my stashes with:
git stash list

Then, apply the most recent stash by running this command:
git stash apply

If you have more than one stash, you can specify which stash you want to apply on the command line. See git stash --help to see more information.


Git diff and patch:

diff and patch are very useful tools to be familiar with if you ever deal with text. Git's diff output is much the same, and so the patch tool is still very handy!

Starting from a clean checkout, I put my temporary changes in place, then run this command:
git diff > ~/patches/temp_workaround.patch

Then I continue on with my work. I selectively leave these changes out of all my commits using git add -i then once everything is checked in except my temporary changes, I revert these temporary changes with git checkout -- . so I'm left with a clean repository.

When I need to work on a related feature again, I can apply my patch by running this command from the project root:
patch -p1 < ~/patches/temp_workaround.patch


Both of these methods will put my temporary work arounds in place again which saves me trying to work out which lines I needed to comment out everytime. Saving the stashes and/or patch files with descriptive names means you can find and re-use these temporary changes quite easily in the future.
Posted by Steve at 20:41 2 comments
Labels: bash , diff , git , patch , programming Email This BlogThis! Share to X Share to Facebook

Code review workflow with GitHub

The more I use Git, the more I love it and less I prefer my once trusty SVN.

A while back I read the book "Pro Git" by Scott Chacon.
The book provides a really good explanation of how Git works and how to use it effectively.
I then found that this book is available online for free and it is now a commonly visited bookmark for me.

Recently my boss sent me a link to a blog post by Scott Chacon that explains the Git workflow that is used at GitHub on a daily basis as we are going to give it a go for our own projects.

In the post, Scott contrasts this to the commonly known "Git-Flow" and describes how they are both good, but Git-Flow is alot more involved, where the aptly known "GitHub-Flow" is a lot simpler and therefore easier to follow.

For full details, I highly recommend reading the post but basically it involves keeping a master branch that is always stable (and deployable) and using topic branches for development. Once a topic branch is tested locally you open a pull request to have others review it and merge it in to master.

Using pull requests within a single repository for code reviews are really useful!
It allows a discussion thread to take place, commenting on individual lines of code and keeps a history of the rational for any changes.

A good aspect of this approach is that these topic branches can be pushed to GitHub constantly as it will not affect anyone else's work, and allows the team to have visibility of who is working on what by simply looking at the branch list page.
This of course means that your branches should be descriptively named.

We have been using this workflow for a little while now and have felt compelled to make a small modification.
We have a staging environment which closely matches the production environment and is externally available to show clients new features, etc.
To cater for this we have introduced an additional long-term branch called "staging".

This doesn't affect our existing workflow for the majority of cases, but every now and then we will merge master into staging, then the topic branch into staging to test/preview/etc. (without the need for pull requests/code review). Once the change is tested/previewed in staging and proven to be good, a pull request is opened for the topic branch to be merged into master (as per usual).

One thing to note here is that it's the topic branch to be merged and not the staging branch. Although in most cases this wont matter, if multiple merges from staging into master occur it can become confusing. Also the merge commit description will contain "repo/staging" instead of something more descriptive, like "repo/bundler-upgrade".

I have really enjoyed using this workflow and it seems to be working quite well so far. In the process of implementing this you really get to see how useful GitHub can be with using pull requests for code reviews and the branch list and network graph features for visualising not only your own progress, but the entire project too.
Posted by Steve at 20:06 0 comments
Labels: git , github , programming Email This BlogThis! Share to X Share to Facebook

GTalkSMS

Continuing on from my last post, I found another great use for Pidgin!

GTalkSMS is an Android app that turns your phone into a chat bot.
Here is an extract from the GTalkSMS website:
GTalkSMS enables you to control your android phone through GTalk/XMPP (send/receive SMS, make calls, locate your phone, etc.). It can be useful for those who prefer typing sms on a real keyboard. The app also notifies you about new "events" on the phone, like a new text message (SMS) or an incoming call.

Although initially skeptical about security (it has the same functions as a would-be trojan) you have to be buddies with the bot to talk to it, so here is what I did...


Basic Setup:
  • Downloaded and installed GTalkSMS from the market
  • Created a google account for GTalkSMS
  • Configured Pidgin with my personal gmail account (obviously)
  • Added this new account as a buddy on my personal gmail account
  • Configured GTalkSMS to send notifications to my personal gmail account

Basic Usage:

With this done, once I start the bot, it will send me a instant message when I get an SMS, phone call or the battery state changes.

What is even better is that if I want to reply to a recently received SMS, I can send the bot an instant message like this:
reply:Hey, I got your message

If I want to initiate an SMS to someone else, I can send this command:
sms:mymate:Hey, how you goin?

That will lookup mymate in my phonebook and send the SMS to them.
If you have multiple people with the same name, you can search your phonebook using this command:
contact:john

This will list all the John's then you can just copy and paste the phone number you want in place of the name, like this:
sms:04041111111:Hey John!

Doing more:

There are heaps of commands available and you can get a list of them all at any time with this command:
help:all

Some other cool commands allow you to change your ringer volume, take a photo, share clipboards, get geolocation, launch a given URL in the browser and lots more.

It also has some options to make GTalkSMS start automatically when the phone boots, or when it is charging, or when its on wifi.
I personally only want this connected while I'm in front of my pc, so I have it set to start when charging and stop when not charging anymore (I use a USB charging dock at my desk).

One other noteworthy feature is the "Incoming SMS" setting "In separated conversations". When you receive an sms, not only does the bot send you an IM, but it will start a new "chat room" for that particular contact and send you an invite. From within this chat room, you dont need to worry about sending commands, whatever you send in there will be sent as an sms to that client. It makes it look seamlessly like any other chat.


Pidgin fun:


As you may already know, I like Pidgin because of its configurability.
I have Pidgin using the libnotify plugin, which means I get the fancy Ubuntu notifications from Pidgin, but I soon realised there are too many notifications by default (everytime a buddy signs in or out is a bit much with 4 chat accounts signed in at once!) - so I turned those notifications off.

But! I wanted these notifications to see when my phone is available to chat, so I set up some little recurring buddy pounces:
  1. When my GTalkSMS account signs in, execute this command:
    notify-send -i "/usr/share/pixmaps/pidgin/emblems/scalable/bot.svg" "Droid online" "Your Android is now contactable via GTalkSMS"
  2. When my GTalkSMS account signs out, execute this command:
    notify-send -i "/usr/share/pixmaps/pidgin/emblems/scalable/unavailable.svg" "Droid offline" "Your Android has now signed off GTalkSMS"

Now when I dock my phone, it starts charging, GTalkSMS starts up and signs in and I get this notification appear:


Then when I pull it off the dock, GTalkSMS signs out and I get this notification:


Note: The notify-send command is available from the libnotify-bin package, which can be installed in Ubuntu with this command:
sudo apt-get install libnotify-bin
Posted by Steve at 20:41 1 comments
Labels: android , pidgin , ubuntu Email This BlogThis! Share to X Share to Facebook

Meta-contacts in Pidgin

Pidgin is my IM client of choice, its one of the first things I replace in a stock installation of Ubuntu.
I chose Pidgin not because of a slick UI but because it has some really nice features!

The two features that stand out the most in my opinion are the "buddy pounces" and the many available plugins:

Buddy pounces:
For those that don't know about pounces, they are little predefined actions that can be triggered upon some configurable event, such as "when <SomeContact> returns from away status, open a conversation window", or "when <SomeContact> signs on, send them a predefined message".

Plugins:
Not only does Pidgin come with lots of plugins by default, but there are a lot of third party plugins available too.
There are basic ones that offer a more robust and configurable way of notifying you of messages, etc and some more fun ones like "psychic mode" - which listens for when a new contact starts typing a message to you and pops up a convo window before they have even sent it.

Meta-contacts:
The one thing that I missed from other IM clients was meta-contacts.
For example, at any one time I have Pidgin signed into my Google chat, MSN and Facebook chat accounts and for those friends of mine that have an account on all three platforms, they appear 3 times in my buddy list.
With meta-contacts you can collapse those 3 contacts into just one.

Well, it turns out this feature has been in Pidgin for quite a while, I just never noticed as its just not quite as obvious as with other clients.

How to use meta-contacts in Pidgin:
To use this feature, all you have to do is right-mouse click on the contact and click "expand" and drag and drop other contacts under the newly expanded name.
You should put the most common account at the top as that is the account is used by default when you double click the contact.

Even though these features aren't exactly ground breaking, when you get used to having them there it becomes a little harder to go back to clients without them.
Posted by Steve at 10:18 0 comments
Labels: linux , pidgin , ubuntu Email This BlogThis! Share to X Share to Facebook
Newer Posts Older Posts Home

Blog Archive

  • ▼  2013 (4)
    • ▼  June (1)
      • Printing over previously printed characters and lines
    • ►  May (1)
    • ►  March (1)
    • ►  January (1)
  • ►  2012 (17)
    • ►  December (1)
    • ►  October (1)
    • ►  September (2)
    • ►  August (2)
    • ►  July (1)
    • ►  May (2)
    • ►  April (2)
    • ►  March (3)
    • ►  February (3)
  • ►  2011 (33)
    • ►  December (1)
    • ►  November (3)
    • ►  October (3)
    • ►  September (4)
    • ►  August (3)
    • ►  July (4)
    • ►  June (6)
    • ►  May (6)
    • ►  April (3)

Labels

android (5) apache (1) arch linux (1) arduino (1) bash (11) calendar (1) compiz (1) design (1) diff (1) email (1) gimp (1) git (3) github (2) gnome3 (1) Google (2) hacking (1) hardware (4) howto (1) htpc (1) java (1) lamp (1) linux (28) Mac (2) minecraft (2) mysql (1) netduino (1) nfs (1) parallel port (1) patch (1) photography (4) php (1) pidgin (2) printer (1) programming (6) python (1) rails (1) regex (5) review (3) ruby (3) Samsung Galaxy S3 (2) Samsung Series 9 (1) security (1) sed (3) ssh (1) sudo (1) tank (2) Toshiba Portege (1) troubleshooting (1) ubuntu (16) ui (2) unity (2) vim (5) webcam (1) websites (3) xbmc (1) xclip (1) xul (1)

Total Pageviews

Sparkline
 
Copyright (c) 2010 Steven Occhipinti. Designed by Conveyancing
High Deductible Health Insurance, Purchase Beats