


If you saw my last post, you would have seen that I recently bought a 13" Samsung Series 9 ultrabook - I still think these machines are stunning!
The problem
There are a couple of little complaints floating around about the Samsung, like heat output, easily finger-printed chasis, but none of these really bother me, but there is one thing that does... alot... and its the wifi!
I could be using the laptop in the next room from my wireless router and it would dropout completely or go incredibly slow, if I move to the other side of the house where my bedroom is, my phone will have full reception, but this laptop will not see the wifi network at all - and this in unacceptable.
The transition
After returning the laptop (twice) I eventually asked for my money back so I could go purchase my second preference - the Macbook Air.
Unfortunately, the shop would not give me a full refund and could only offer me a credit note.
I tried to explain that no other units in store could offer me the same specs that I was after, the Samsung's best competition is the Macbook Air, but as they couldn't help me I asked to see what else they have in a light 13".
The sales guy showed me an Asus Zenbook and a new product which had just arrived to their store, the Toshiba Portege Z830.
I was lucky enough to be the first to see this at their store and even got to open the display model and check it out.
The decision between the two was tough!
The Asus Zenbook had a very sturdy exterior and had a similar tapered
design to the Macbook Air while the Toshiba Portege had a business feel
to it, but was slightly lighter and thinner.
They were both similarly spec'ed with Core i5's, 128GB SSD's and 4GB of RAM, but there were a few notable differences between them.
Although the Asus Zenbook does not have a backlit keyboard and has reduced size ports, it does has a higher resolution screen than the Samsung and Toshiba, but like the Mac it's a glossy screen. I personally prefer matte screens because even in brightly lit areas or even outside in direct sunlight, the screen is alot more visible.
The Toshiba Portege has a matte screen, backlit keyboard, has a full size HDMI port, VGA port, Ethernet port, 2x USB 2.0 ports, 1x USB 3.0 port and SD card reader and its thinner and lighter. Toshiba also give a 3 year warranty out-of-the-box with this model.
The screen is quite a bit more flimsy than the others and the system fan does tend to groan a little (compared to the Samsung at least), but this is probably all I can complain about.
The solution
I took a day to think about it and eventually made up my mind for the Portege.
In the US, there is an i7 variety with 6GB of RAM, but I don't really want to wait for it to get here.
I took a look at a comparison between the i7 from the Samsung and the i5 from the Toshiba, and while I would have paid the extra for the i7, I don't think I'll really notice the difference in most scenarios.
It seems I am not the only one who ended up swapping a Samsung Series 9 for a Toshiba Portege Z830 either, I came across this blog post where the author goes into more detail and provides results of quite specific tests.
In the end I paid $1539 for the laptop with a 3 year warranty and then an extra $79 to upgrade it to 6GB of RAM.
While it's no Samsung Series 9, its pretty nice and the cut in performance saved me a little more than $600.

13" Core i7 Samsung Series 9 Ultrabook
Back in my first year of uni, I bought one of the early Core Duo (not Core 2 Duo) 15" Asus laptops which at the time was great and it had a decent graphics card for games, etc.
Roughly 6 years later, its showing its age. The battery lasts less than an hour now, it weighs about 3kg not including the adapter and performance is lacking compared to todays technology.
After a recent shoulder injury and a busy week that involved me carrying my laptop from place to place, I decided it was time to reward myself with an early Christmas present and buy a new machine.
My requirements were:
Asus u-Series
The Asus machines, as usual, had a very good bang-for-buck, a nice thickness of 19mm and unlike most others, some models had full size video output and ethernet plugs.
While the price and size were right, the highest spec'ed machines were not quite as impressive as its competition. If budget was the number one concern, the Asus u-Series and Zenbook range offer pretty good value.
Macbook Air
I have never been a "Mac person" due to the traditional heavy pricing and proprietary nature of alot of their products, but these days (after some convincing) I believe the hardware and even price does have a surprisingly strong position in the competition.
The 13" Macbook Pro and Macbook Air both had very good specs to offer for around the $2000 price tag, both with Core i7's, 4-8GB RAM and SSD's, not to mention pretty attractive packaging.
After seeing a Macbook Air up close, I really liked how the thickest point is about 17mm or so at the back but it tapers off to next to nothing at the front.
So the model I chose for comparison purposes was worth $1928.99 and had the following specs:
The operating system did not bother me too much either as I intended to be running Linux as my primary OS anyway, but having a Mac would give me more familiarity with OSX which would be helpful considering its popularity in my line of work.
The minor annoyances would be: expensive adapters for video and ethernet ports, unfamiliar keyboard layout (command key where alt should be, etc), non-upgradeable ram, glossy screen, etc. - but those are pretty minor.
Samsung Series 9
I found these ultrabooks to have a very unique look and one of the first well thought out, thin designs that are not just another Mac look-a-like.
The sales pitch always includes a spiel about its "Duralumin"- which is a light and strong material used in aircrafts and while it looks stunning and adds sophistication and uniqueness to the overall design on the unit, this material along with the black plastic are both fingerprint magnets!
The specs of the Series 9 unit I used for comparison (and ultimately bought) was quite good:
The one big catch with this system is the RRP of ~$2700, while most Aussie shops sold them for ~$2500. This made me consider the Mac even more!
But during my research I saw MLN's price drop down to a much more attractive $1997 and immediately rang them to find out more details and how long the special would last. It turns out that Samsung are starting to phase them out of stores (presumably to make way for a new product next year) and naturally they had sold alot of units and only had a few left.
I did a bit more research and found that to save space, the ports are hidden behind very aircraft-like flaps, but as with the Mac, they are reduced size ports.
The video output is provided in the form of a micro-HDMI port - which is at least a more common format and I don't need to go through apple.com.
The other space-saving trade-off was a (sadly) proprietary ethernet port that comes bundled with an adapter to convert it to RJ45 - but unlike the Mac where you need to buy a USB network adapter, this actually has the network card built in, it just has an unusual plug - which I don't intend to use much anyway.
Another plus is this model comes with 1x USB 3.0 port (and a 2.0 port) which is great considering the speeds my brother gets with his USB 3.0 flash drive.
So I went to MLN and inspected the unit up close and what eventually made my decision for the Samsung was that for about the same price I get a machine with double the RAM (handy for VMs), a windows licence for portable gaming and a bunch of freebies from MLN including the HDMI to micro-HDMI cable, a set of Sennheiser headphones and a padded sleeve to carry it.
I was able to get the cable and sleeve free because I opted to purchase the extended 3 year pickup warranty for an additional $180ish and the headphones were a Christmas present :)
Initial impressions are very positive, the screen is incredibly bright and vibrant and with a smooth matte finish, I have had no issues using it outdoors.
The backlit keyboard is quite nice too, although the brightness of this light is controlled via windows drivers, so in linux (at this stage) I cant control its brightness.
The touchpad is large and seems to employ the same technique as the Mac Magic Mouse where there is one click-able button (the lower part of the pad) and depending on where your finger is when you click determines a right or left mouse click and once again, this doesnt work in Linux out of the box, but the standard 2 finger tap works as per normal.
Using Ubuntu 11.10 the rest of the hardware works out of the box, so no need to fiddle with drivers for network, graphics, webcam, etc.
Overall I am very happy with my purchase and its a huge step up from my old 15.4" 3kg laptop!
Roughly 6 years later, its showing its age. The battery lasts less than an hour now, it weighs about 3kg not including the adapter and performance is lacking compared to todays technology.
After a recent shoulder injury and a busy week that involved me carrying my laptop from place to place, I decided it was time to reward myself with an early Christmas present and buy a new machine.
My requirements were:
- 13" screen
- As thin and as light as possible to aid portability
- Powerful enough to do almost anything my daily activities could involve
- <~ $2000
Asus u-Series
The Asus machines, as usual, had a very good bang-for-buck, a nice thickness of 19mm and unlike most others, some models had full size video output and ethernet plugs.
While the price and size were right, the highest spec'ed machines were not quite as impressive as its competition. If budget was the number one concern, the Asus u-Series and Zenbook range offer pretty good value.
Macbook Air
I have never been a "Mac person" due to the traditional heavy pricing and proprietary nature of alot of their products, but these days (after some convincing) I believe the hardware and even price does have a surprisingly strong position in the competition.
The 13" Macbook Pro and Macbook Air both had very good specs to offer for around the $2000 price tag, both with Core i7's, 4-8GB RAM and SSD's, not to mention pretty attractive packaging.
After seeing a Macbook Air up close, I really liked how the thickest point is about 17mm or so at the back but it tapers off to next to nothing at the front.
So the model I chose for comparison purposes was worth $1928.99 and had the following specs:
- 1.8GHz Dual-Core Intel Core i7
- 4GB 1333MHz DDR3 SDRAM
- 256GB flash storage
- Mini DisplayPort to DVI adapter ($30)
The operating system did not bother me too much either as I intended to be running Linux as my primary OS anyway, but having a Mac would give me more familiarity with OSX which would be helpful considering its popularity in my line of work.
The minor annoyances would be: expensive adapters for video and ethernet ports, unfamiliar keyboard layout (command key where alt should be, etc), non-upgradeable ram, glossy screen, etc. - but those are pretty minor.
Samsung Series 9
I found these ultrabooks to have a very unique look and one of the first well thought out, thin designs that are not just another Mac look-a-like.
The sales pitch always includes a spiel about its "Duralumin"- which is a light and strong material used in aircrafts and while it looks stunning and adds sophistication and uniqueness to the overall design on the unit, this material along with the black plastic are both fingerprint magnets!
The specs of the Series 9 unit I used for comparison (and ultimately bought) was quite good:
- 1.5GHz Core i7
- 8GB RAM
- 256GB SSD
- Micro-HDMI to HDMI adapter ($15)
The one big catch with this system is the RRP of ~$2700, while most Aussie shops sold them for ~$2500. This made me consider the Mac even more!
But during my research I saw MLN's price drop down to a much more attractive $1997 and immediately rang them to find out more details and how long the special would last. It turns out that Samsung are starting to phase them out of stores (presumably to make way for a new product next year) and naturally they had sold alot of units and only had a few left.
I did a bit more research and found that to save space, the ports are hidden behind very aircraft-like flaps, but as with the Mac, they are reduced size ports.
The video output is provided in the form of a micro-HDMI port - which is at least a more common format and I don't need to go through apple.com.
The other space-saving trade-off was a (sadly) proprietary ethernet port that comes bundled with an adapter to convert it to RJ45 - but unlike the Mac where you need to buy a USB network adapter, this actually has the network card built in, it just has an unusual plug - which I don't intend to use much anyway.
Another plus is this model comes with 1x USB 3.0 port (and a 2.0 port) which is great considering the speeds my brother gets with his USB 3.0 flash drive.
So I went to MLN and inspected the unit up close and what eventually made my decision for the Samsung was that for about the same price I get a machine with double the RAM (handy for VMs), a windows licence for portable gaming and a bunch of freebies from MLN including the HDMI to micro-HDMI cable, a set of Sennheiser headphones and a padded sleeve to carry it.
I was able to get the cable and sleeve free because I opted to purchase the extended 3 year pickup warranty for an additional $180ish and the headphones were a Christmas present :)
Initial impressions are very positive, the screen is incredibly bright and vibrant and with a smooth matte finish, I have had no issues using it outdoors.
The backlit keyboard is quite nice too, although the brightness of this light is controlled via windows drivers, so in linux (at this stage) I cant control its brightness.
The touchpad is large and seems to employ the same technique as the Mac Magic Mouse where there is one click-able button (the lower part of the pad) and depending on where your finger is when you click determines a right or left mouse click and once again, this doesnt work in Linux out of the box, but the standard 2 finger tap works as per normal.
Using Ubuntu 11.10 the rest of the hardware works out of the box, so no need to fiddle with drivers for network, graphics, webcam, etc.
Overall I am very happy with my purchase and its a huge step up from my old 15.4" 3kg laptop!
Removing geotag data from JPGs
Just a quick note, these days most cameras automatically geotag photos which is pretty cool, especially when taking travel photos, but sometimes you may not want everyone to know where a photo was actually taken.
For example, a photo of your backyard could give away your home address which is probably not a great thing.
Its really easy to clear the geotag data with a great little tool called exiftool.
I used this tool in an earlier blog post too and I find it really useful!
To install exiftool in Ubuntu:
Then executing exiftool followed by a jpg filename will output a whole bunch of exif data for you - some of which may have geolocation data:
The clear this geotag data out, simply issue this command:
For example, a photo of your backyard could give away your home address which is probably not a great thing.
Its really easy to clear the geotag data with a great little tool called exiftool.
I used this tool in an earlier blog post too and I find it really useful!
To install exiftool in Ubuntu:
$> sudo apt-get install libimage-exiftool-perl
Then executing exiftool followed by a jpg filename will output a whole bunch of exif data for you - some of which may have geolocation data:
$> exiftool image.jpg
ExifTool Version Number : 8.60
File Name : image.jpg
Directory : .
File Size : 14 kB
...
The clear this geotag data out, simply issue this command:
$> exiftool -gps:all= image.jpg
Motion detection
The way my desk is positioned means that when I'm on my computer I face the corner of the room, which means the door is behind me.
Quite often I'll stay up late working away till early hours of the morning and usually music comes hand-in-hand with coding (for me anyway), so when it's late, I use headphones so I don't disturb anyone else.
This has caused me some grief as sometimes someone will come into my room for whatever reason and find me with my back to the them and headphones in, so knocking at the door or saying my name does not get my attention.
This leaves the last resort of tapping me on the shoulder which scares the crap out of me!
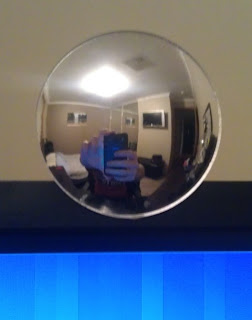
A while ago I invested in a convex mirror designed to go on your computer screen so you can see who's coming up from behind.
Well, with a 24-inch screen and deep concentration, this small mirror doesn't catch me eye at all, so I still hit the ceiling when someone taps me on the shoulder.
For my birthday I got this amazing Astro A40 headset. Sound clarity is absolutely stunning, they are really comfortable to wear and they block out a lot of surrounding background noise.
While I absolutely love the headset and wear it all the time, you can probably guess this adds to my jumpy-ness!
So I finally found a solution!
There is a package in the Ubuntu repositories called "motion" - which is a really simple motion detection server that utilises a webcam.
I had a look at "zoneminder" too, but it seems very over-kill for my needs.
motion will detect movement (above a configurable threshold), store "movement" snapshots and video files, log to a database and more importantly it provides a few hooks to fire commands upon events such as on_event_start, on_motion_detected, etc.
I disabled almost every option except the on_event_start hook.
This hook will execute the given command when motion has been detected after a (configurable) "gap" period of time of no motion - which I set to 10 seconds.
The command I set it to execute is this:
As mentioned in an earlier blog post, notify-send can be found in the libnotify-bin package
Note: the --hint=int:transient:1 is for Gnome-Shell which has introduced persistent notifcations and I didn't want to acknowledge a notification everytime someone walks past!
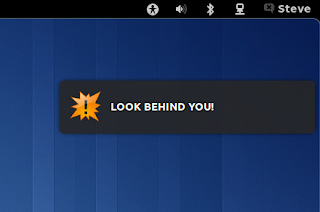
The end result of this little hack is when someone walks anywhere near my doorway, that command gets my attention with a standard Gnome-Shell notification from the bottom of the screen like this:

The reason I am using sudo here is that motion needs to be run as root, and so the notify-send command will also be run as root.
I guess because I had Unity installed before Gnome-Shell, when root runs notify-send, I get the Unity style notifications - which is still nice, but as I'm road testing Gnome-Shell, I figured I may as well use its notification look-n-feel too.
Here's what it looks like if you leave out the sudo -u steve part:
Quite often I'll stay up late working away till early hours of the morning and usually music comes hand-in-hand with coding (for me anyway), so when it's late, I use headphones so I don't disturb anyone else.
This has caused me some grief as sometimes someone will come into my room for whatever reason and find me with my back to the them and headphones in, so knocking at the door or saying my name does not get my attention.
This leaves the last resort of tapping me on the shoulder which scares the crap out of me!
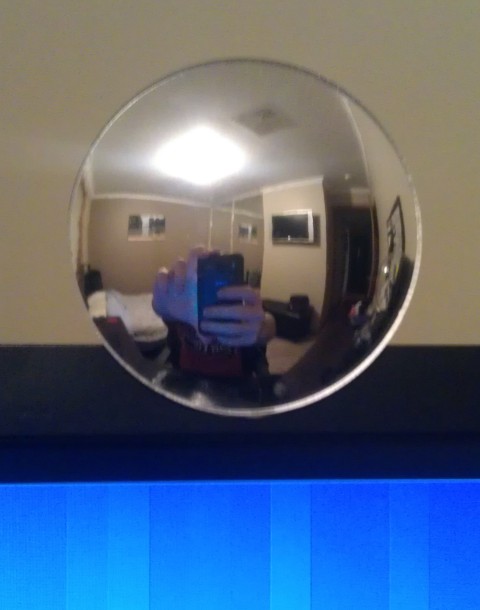
A while ago I invested in a convex mirror designed to go on your computer screen so you can see who's coming up from behind.
Well, with a 24-inch screen and deep concentration, this small mirror doesn't catch me eye at all, so I still hit the ceiling when someone taps me on the shoulder.
For my birthday I got this amazing Astro A40 headset. Sound clarity is absolutely stunning, they are really comfortable to wear and they block out a lot of surrounding background noise.
While I absolutely love the headset and wear it all the time, you can probably guess this adds to my jumpy-ness!
So I finally found a solution!
There is a package in the Ubuntu repositories called "motion" - which is a really simple motion detection server that utilises a webcam.
I had a look at "zoneminder" too, but it seems very over-kill for my needs.
motion will detect movement (above a configurable threshold), store "movement" snapshots and video files, log to a database and more importantly it provides a few hooks to fire commands upon events such as on_event_start, on_motion_detected, etc.
I disabled almost every option except the on_event_start hook.
This hook will execute the given command when motion has been detected after a (configurable) "gap" period of time of no motion - which I set to 10 seconds.
The command I set it to execute is this:
sudo -u steve notify-send --hint=int:transient:1 -i '/usr/share/icons/hicolor/scalable/mimetypes/text-x-apport.svg' 'LOOK BEHIND YOU!'
As mentioned in an earlier blog post, notify-send can be found in the libnotify-bin package
Note: the --hint=int:transient:1 is for Gnome-Shell which has introduced persistent notifcations and I didn't want to acknowledge a notification everytime someone walks past!
The end result of this little hack is when someone walks anywhere near my doorway, that command gets my attention with a standard Gnome-Shell notification from the bottom of the screen like this:

The reason I am using sudo here is that motion needs to be run as root, and so the notify-send command will also be run as root.
I guess because I had Unity installed before Gnome-Shell, when root runs notify-send, I get the Unity style notifications - which is still nice, but as I'm road testing Gnome-Shell, I figured I may as well use its notification look-n-feel too.
Here's what it looks like if you leave out the sudo -u steve part:

Disabling the Unity global menu
The Unity global menubar in Ubuntu can take a bit of getting used to, especially if you don't come from a Mac background, but once you do, the screen real estate saving is quite nice, especially on small screens like my eeepc.
But sometimes it can be frustrating!
For example, if you use The Gimp, alot of its functionality is in the menu, but for that to show, you must have the main window (the one with your work in it) focused, but whenever you select a tool from the toolbox, that window loses focus, and therefore you can't get to the menu.
I know all it takes is a click in the main window and then a click on the global menu, but this can get quite annoying.
Thankfully, there is an off-switch in the form of an env-var which you can either add to your profile to completely disable it, or just prefix it before you run commands like gimp.
All you need to do to disable it is set this:
I made an alias so its easier to remember:
Note that typing (or shouting) dam gimp is not only to relieve the frustration of the global menubar, but it also stands for "Disable AppMenu" :)
There is a full write up with more details over at webupd8.org
But sometimes it can be frustrating!
For example, if you use The Gimp, alot of its functionality is in the menu, but for that to show, you must have the main window (the one with your work in it) focused, but whenever you select a tool from the toolbox, that window loses focus, and therefore you can't get to the menu.
I know all it takes is a click in the main window and then a click on the global menu, but this can get quite annoying.
Thankfully, there is an off-switch in the form of an env-var which you can either add to your profile to completely disable it, or just prefix it before you run commands like gimp.
All you need to do to disable it is set this:
UBUNTU_MENUPROXY=0
I made an alias so its easier to remember:
alias dam='UBUNTU_MENUPROXY=0 '
Note that typing (or shouting) dam gimp is not only to relieve the frustration of the global menubar, but it also stands for "Disable AppMenu" :)
There is a full write up with more details over at webupd8.org
Recursive search with vimgrep
Usually when I need to find things in multiple files, I would use grep or ack from a terminal and then open those files in vim to do whatever it is that I have to do.
This is ok, but sometimes this can be a little annoying.
Vim has a :grep function which will use the system grep command, but it also has a :vimgrep function that is built in to vim.
I had left a bunch of TODO's through out my code as a reminder to come back to them, so using :vimgrep I was able to quickly jump between them:
This tells vim to search for the pattern "TODO" recursively from the current directory.
The "**/" means recursive and the "*" means any file - therefore "**/*.rb" would just search the ruby scripts.
The results are loaded into the "quickfix window". This means if you want to see all the occurences, you can open the list with :copen
Naturally, :cnext, :cprevious, :cfirst, :clast, etc. will allow you to jump between them or you can use the quicklist window and press enter on the filename, or in gvim you can even use the mouse.
In addition, I use Tim Pope's Unimpaired vim plugin,which provides the easy shortcuts '[q' and ']q' for :cprevious and :cnext (respectively)
This is ok, but sometimes this can be a little annoying.
Vim has a :grep function which will use the system grep command, but it also has a :vimgrep function that is built in to vim.
I had left a bunch of TODO's through out my code as a reminder to come back to them, so using :vimgrep I was able to quickly jump between them:
:vimgrep TODO **/*
This tells vim to search for the pattern "TODO" recursively from the current directory.
The "**/" means recursive and the "*" means any file - therefore "**/*.rb" would just search the ruby scripts.
The results are loaded into the "quickfix window". This means if you want to see all the occurences, you can open the list with :copen
Naturally, :cnext, :cprevious, :cfirst, :clast, etc. will allow you to jump between them or you can use the quicklist window and press enter on the filename, or in gvim you can even use the mouse.
In addition, I use Tim Pope's Unimpaired vim plugin,which provides the easy shortcuts '[q' and ']q' for :cprevious and :cnext (respectively)
Ruby + parallel port + LEDs
In the initial R&D stages for our Tank Project we have to work out the most suitable way to interface from software to hardware - which I have never done before!
The parallel port
One of those options is to use the parallel port, which allows us 8 data pins that we can use for controlling motors, etc.
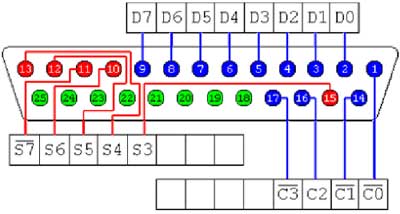
The layout of a parallel port is quite easy, there are 8 "D" pins for data with 8 matching "Ground" pins (shown in green below).
 The test rig
As the output from the parallel port is about 5 volts, I though LED's were a suitable was of testing this out, so I went searching through our garage to find a parallel cable from an old printer and a bunch of LED's.
I found a bunch of tristate LED's - tristates have 3 legs instead of 2 and provide 2 different colors depending on which legs have power to them.
For example, if the circuit connects the left leg and the middle leg, it produces green light, whereas the right leg and middle leg produce red light.
Soldering 4 of these LEDs to a board meant I could join all the middle legs together which would be what I connect the ground wire from the parallel port to and the other 8 legs to the 8 data wires.
The software
In order to control when each of the data pins has power to it or not, you simply have to write 8 bits (a byte) to the parallel port where each bit corresponds to a data pin.
In linux this is quite simple as you can write to /dev/port just like any other file.
To test this out, I wrote a little Ruby script to play a fancy little sequence a few times. The code is quite simple considering some other examples on the net:
The fun part!
So my computer doesn't have a parallel port, but we have some older machines that do. So I found an old pc and booted off a linux live distro that has ruby, plugged in the cable with the LEDs on it, and ran my script, and this is what happens:
The conclusion
This is the first time I have ever written a program that uses hardware, albeit really basic hardware, but this has a lot of potential.
Instead of turning on lights, this small current could trigger relays to do more exciting things, or in our case power transistors using PWM to control motor speed for our tank - and its so simple!
The parallel port
One of those options is to use the parallel port, which allows us 8 data pins that we can use for controlling motors, etc.
The layout of a parallel port is quite easy, there are 8 "D" pins for data with 8 matching "Ground" pins (shown in green below).
As the output from the parallel port is about 5 volts, I though LED's were a suitable was of testing this out, so I went searching through our garage to find a parallel cable from an old printer and a bunch of LED's.
I found a bunch of tristate LED's - tristates have 3 legs instead of 2 and provide 2 different colors depending on which legs have power to them.
For example, if the circuit connects the left leg and the middle leg, it produces green light, whereas the right leg and middle leg produce red light.
Soldering 4 of these LEDs to a board meant I could join all the middle legs together which would be what I connect the ground wire from the parallel port to and the other 8 legs to the 8 data wires.
The software
In order to control when each of the data pins has power to it or not, you simply have to write 8 bits (a byte) to the parallel port where each bit corresponds to a data pin.
In linux this is quite simple as you can write to /dev/port just like any other file.
To test this out, I wrote a little Ruby script to play a fancy little sequence a few times. The code is quite simple considering some other examples on the net:
The fun part!
So my computer doesn't have a parallel port, but we have some older machines that do. So I found an old pc and booted off a linux live distro that has ruby, plugged in the cable with the LEDs on it, and ran my script, and this is what happens:
This is the first time I have ever written a program that uses hardware, albeit really basic hardware, but this has a lot of potential.
Instead of turning on lights, this small current could trigger relays to do more exciting things, or in our case power transistors using PWM to control motor speed for our tank - and its so simple!